1. The Big Picture
A product or service is what you offer the world. A Pricing Plan is how you price it, and for most businesses that’s not one flat number, it’s regional rate cards, usage-based charges, tax rules, tiered seats, different terms for retail vs enterprise. Pricing Template. The canvas behind all of this: the space within which a Pricing Plan is the ultimate target. It declares what’s available to build with, no prices, no formulas, just the structure. A template typically maps to one product or service line, but that’s a choice, not a rule. Pricing Module. Everything built on top of a template is a Pricing Module, one underlying concept, configured differently depending on the job: a reusable rate card, a reusable set of charging rules, or a complete Plan a customer subscribes to. See Pricing Module for how that configuration works. Subscription. The live contract. When a customer subscribes to a Plan, it captures their actual values for whatever the template defined (like SLA Tier or seat count), and from there usage and rate cards get processed into charges every cycle.2. Configuring a Pricing Template (UI Builder Guide)
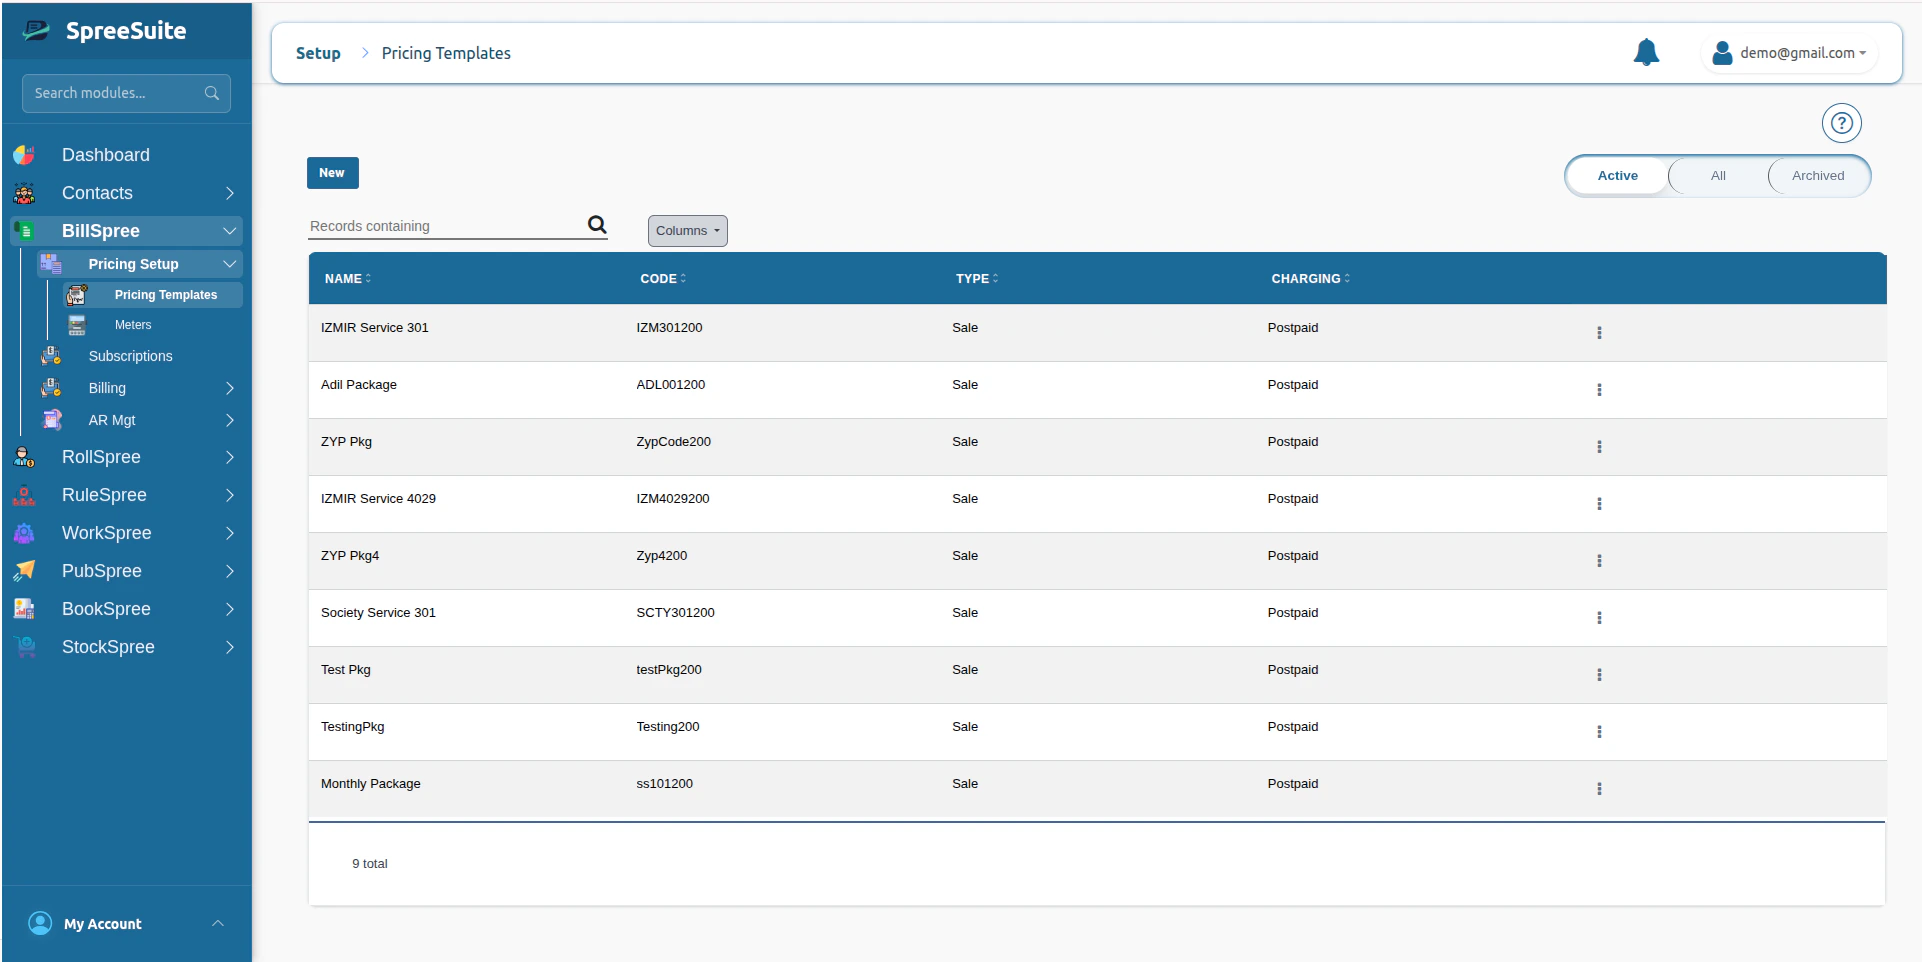
Creating and configuring a Pricing Template is done directly in the admin console. Below is the step-by-step flow of how to navigate the template builder interface and configure each core structural pillar.Step 1: List Pricing Templates
Navigate to: BillSpree → Billing Setup → Pricing Templates. This displays the list of all existing Pricing Templates. From here, you can create, edit, archive, or open a template to manage plans and billing setups.Step 2: Create a New Template
Click on the New button in the upper right corner of the Pricing Templates screen to launch the template creator.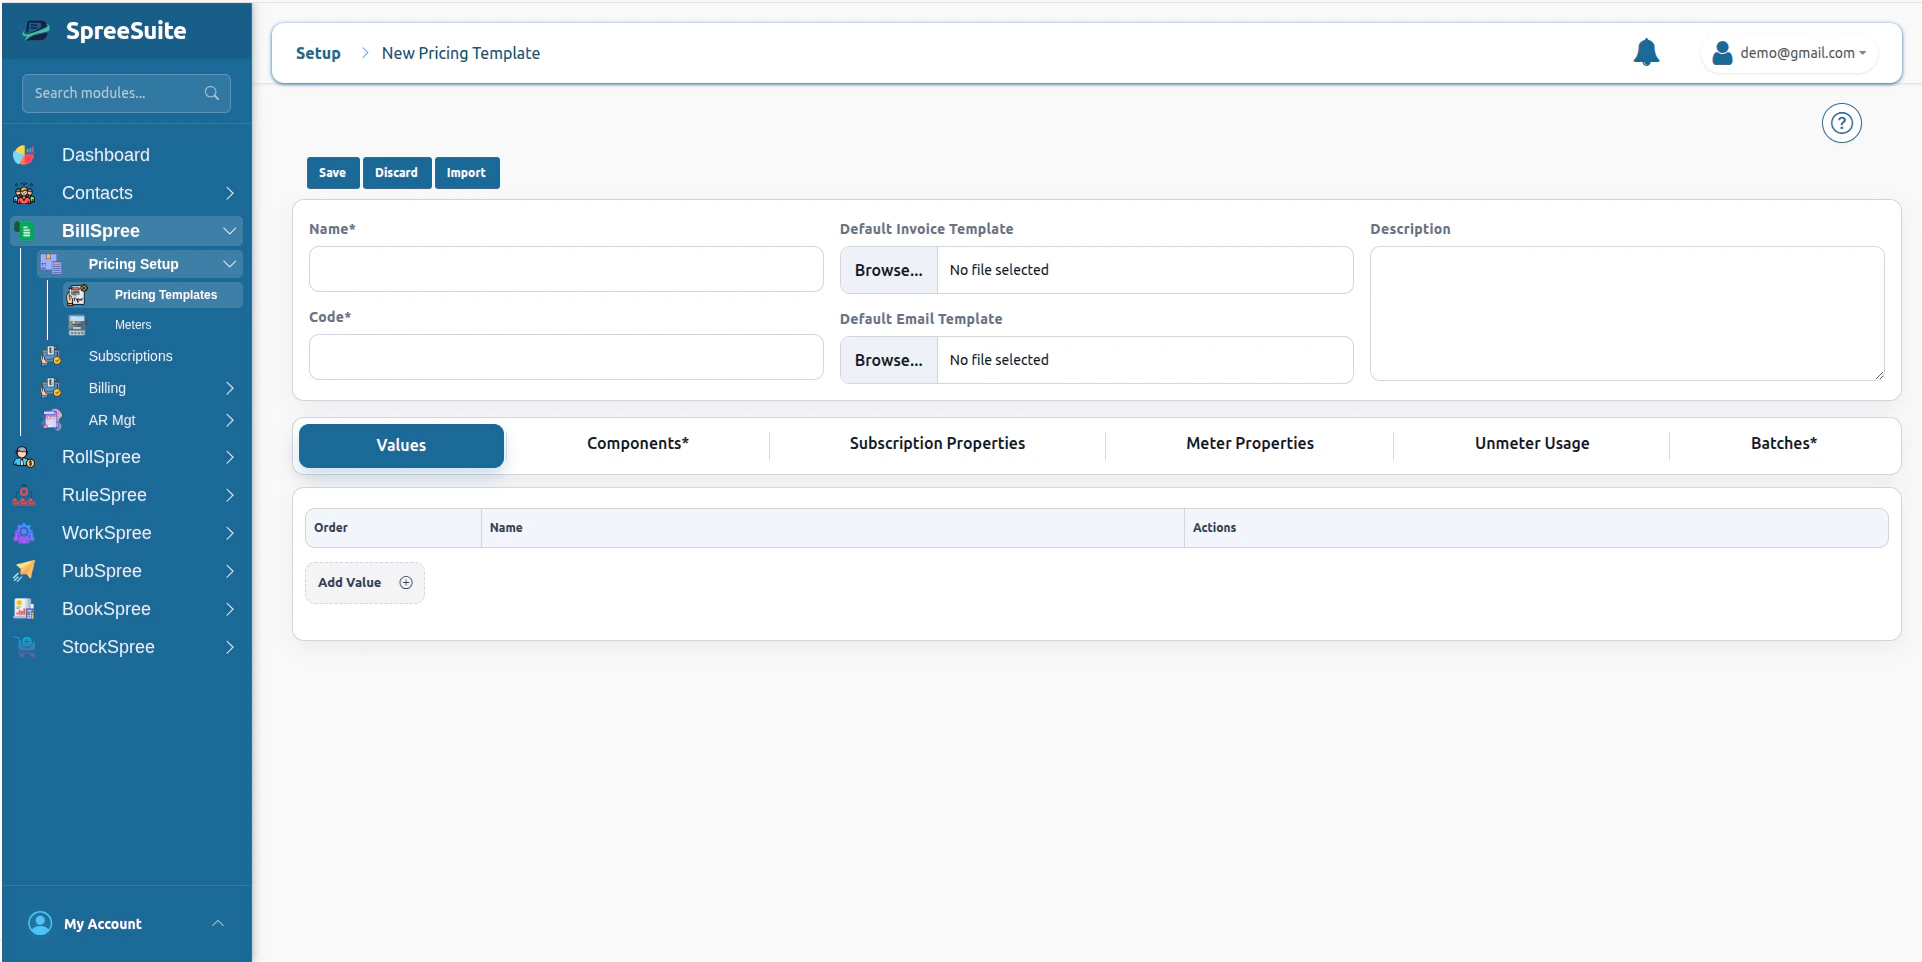
Step 3: Configure Identity Information & Default Templates
Before opening any tab, configure the core identity of the Pricing Template itself:- Identity Information: Define general metadata such as Name, Code, and Description to identify the template.
- Default Invoice Template: Attach a master invoice template—typically a Word document (.docx)—which serves as the master visual layout for customer bills. This template contains merge placeholders (enclosed in curly braces
{}like{partyName},{Electricity Charges}, or{KWH_currentReading}) representing the Rate List components, Charge List components, and meter properties that the billing engine will automatically populate. - Default Email Template: A text file (subject + content) sent alongside the bill, using the same merge-field placeholder style as the invoice template—but referencing bill-level fields rather than per-component charges.
Pricing Templates do not carry Security Attributes / ABAC scoping of their own. A Template is visible to anyone with admin access regardless of region, department, or tenant; security scoping only applies once you get to the Pricing Module level (Rate Cards, Charges Rules, Plans).
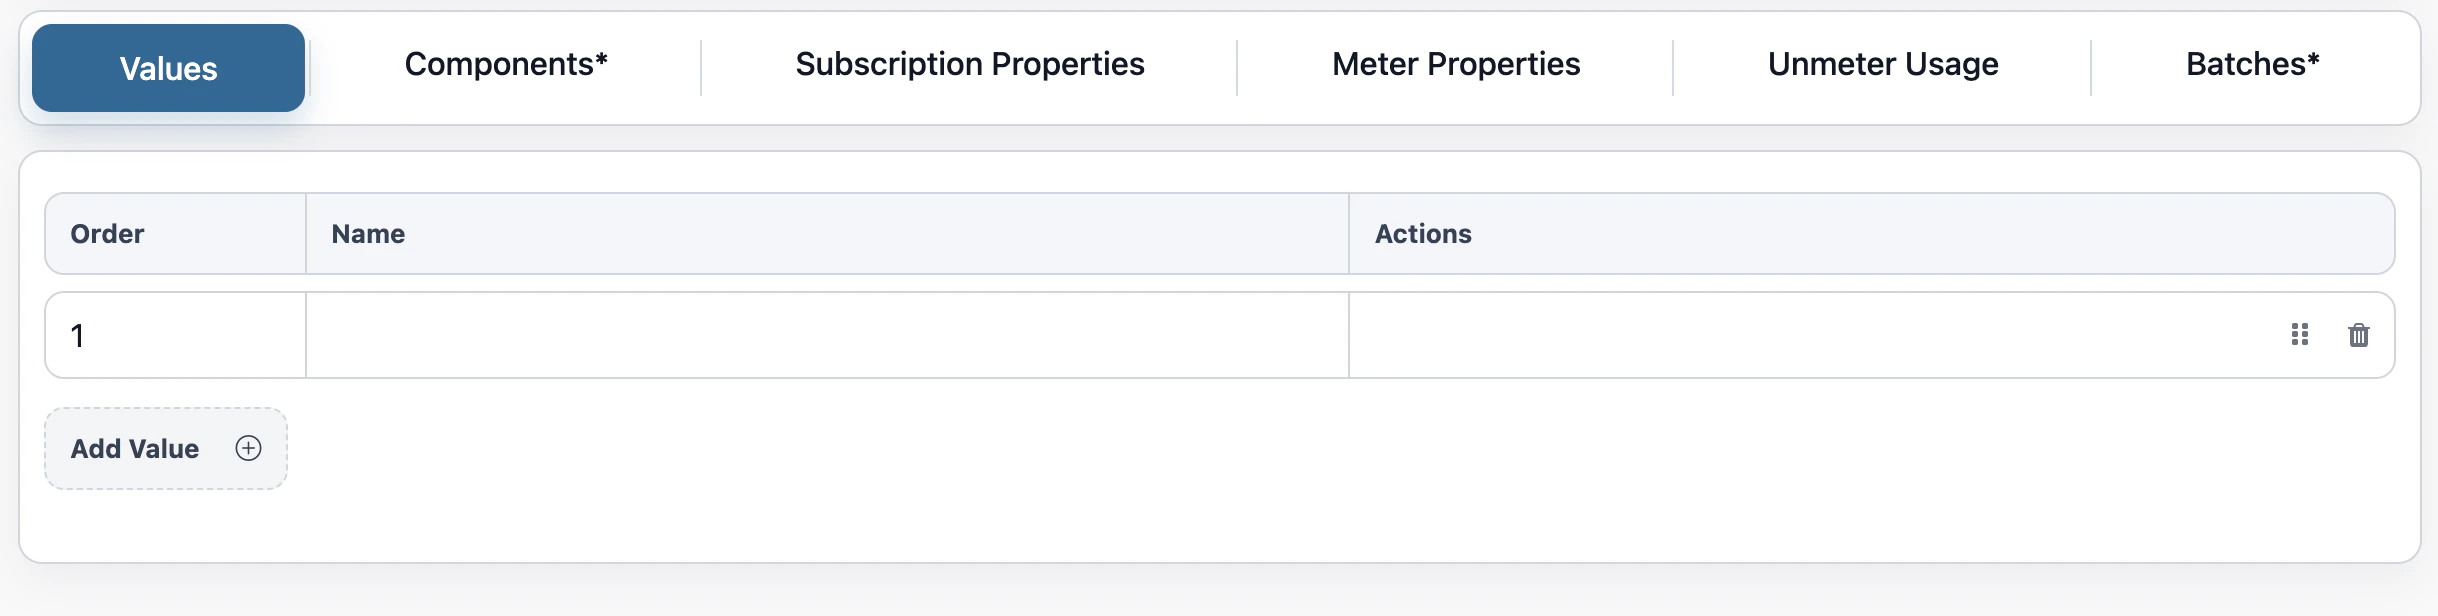
Step 4: Configure Rate List Components (The “Values” Tab)
Click on the Values tab. Here you define your Rate List Components (the pricing placeholders or “slots” that will have actual monetary values assigned later when creating a Plan). Each entry has an Order and a Name—nothing else; a Value is a constant-only slot, with no rules attached. These placeholders should align with the Rate List fields used in your attached Invoice Template:- Base Pricing Slots: Placeholders for fixed access fees (e.g., “Platform Access Fee”).
- Unit Pricing Slots: Placeholders for consumption rates (e.g., “Per-GB Storage Rate”, “Per-User License Rate”).
- Tiered Pricing Slots: Structures for volume discounts (e.g., “First 100 API Calls”, “Next 900 API Calls”).
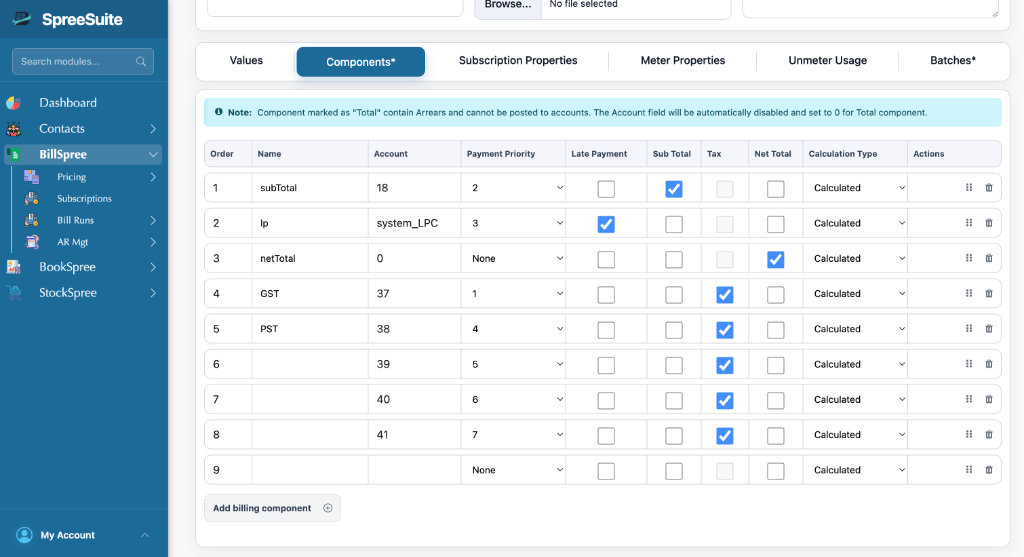
Step 5: Configure Charge List Components (The “Component” Tab)
Click on the Component tab. This is where you configure your Charge List Components—the core calculation models that process rates, properties, and usage into final invoice line items. Multiple components can combine to produce a single bill line item; a component is a calculation unit, not necessarily a line item itself. Each component has the following fields:| Field | Description |
|---|---|
| Order | Position in the calculation sequence. A component can reference any earlier component (by Order) in its formula, but never a later one—this guarantees no circular references. |
| Name | Identifies the component. |
| Account | The ledger account this component’s calculated amount posts to. Only present on components flagged Subtotal, Late Payment, or Tax—see below. |
| Payment Priority | Determines which component an incoming payment is applied against first. Lowest priority number settles first; if the payment doesn’t cover everything owed, it’s exhausted in priority order before later components see any of it. Only present on the same components that have an Account—Subtotal, Late Payment, and Tax—since only those have a posted balance to settle. Assigned automatically (see below). |
| Late Payment Flag | Marks the component as the one late payment surcharges apply against. Calculated at bill generation, but only posted once the grace period elapses unpaid. |
| Subtotal Flag | Marks the component representing the current cycle’s service charges only—tax is a separate, independently-posted component, not folded into Subtotal. This is what actually posts as billed revenue at bill generation. |
| Tax Flag | Marks the component as a tax line (up to 5 per template, see below). |
| Net Total Flag | Marks the component representing the bill’s running total (Subtotal + Tax + Arrears, later + Late Payment once applied). Has no Account—see below for why. |
| Calculation Type | Manual (a fixed number, no rule) or Calculated (governed by a Rule). This is a property of the component itself, decided once here on the template, not chosen separately by each Pricing Module built on it. It also controls visibility in the Module builder: a Calculated component appears as a tab you can author rules against; a Manual component doesn’t appear there at all. |

Component Rules and Constraints
To ensure billing integrity, several rules apply when setting up components: 1. Required Components A Pricing Template cannot be created unless exactly one component is flagged Subtotal, one is flagged Late Payment, and one is flagged Net Total. These three flags are mandatory, not optional—there is no partial or draft state without them. 2. Dynamic Payment Priority Assignment The system automatically assigns dynamic, sequential payment priorities to billing components. When you mark a component as Subtotal, Tax, or Late Payment, the system scans currently used priorities in the package and automatically assigns the next available priority number. This ensures a single pricing package can have multiple independent tax components without priority level clashes during payment settlements.Worked exampleA customer’s bill has a Subtotal of 150 (Priority 2), and a Tax component of 1,200 owed in total. The customer pays $1,000.The payment settles in priority order: 200. That 150 Late Payment charge in full, leaving 50 is applied against the 200 of tax unpaid—which carries forward as arrears.
system_Tax1 through system_Tax5), and they’re attached automatically, in sequence, as you mark components with the Tax Flag. The system tracks the number of taxes selected. Once you reach 5 tax components, the tax checkbox on all other unselected rows is instantly disabled.
Why only Subtotal, Late Payment, and Tax postAt bill run time, Subtotal (service charges only) and any Tax components are calculated and posted, each to its own account, these are the actual billed revenue and tax transactions for the cycle. Late Payment is calculated at the same time but posts later, only once the grace period elapses with the bill still unpaid.Net Total is never one of the posting components. It’s a running display figure, Subtotal + Tax + Arrears (carried-forward unpaid amounts from prior cycles, already posted back when they were originally billed), and later + Late Payment once that’s applied. It aggregates amounts that are already posted independently by their own components, so it has nothing of its own to post.The same applies to any plain intermediate component used only to help calculate Subtotal (via Component Chaining)—it’s a calculation step, not something that posts on its own.None of this is automatic. Subtotal’s formula, Tax’s formula, Net Total’s formula, every Calculated component’s formula is explicitly authored by the user in the Pricing Module/Plan. The system can advise on how to write a rule, but it never writes or infers one for you.
These constraints make the Pricing Template more robust by preventing account mapping errors for system-calculated Totals, restricting tax distributions to the supported threshold, and enforcing conflict-free payment priorities.
Step 6: Configure Subscription Properties (The “Subscription Properties” Tab)
Click on the Subscription Properties tab. Here, you set up the dynamic data parameter fields (the “customer profile” hooks) required from the customer during checkout and used as inputs for your rating rules. Each property has a Name and a Type, and the type is one of:- List: A set of predefined string values to choose from (e.g.,
SLA_Level: [“Gold”, “Silver”, “Bronze”],Deployment_Region: [“US-East”, “EU-West”]). - Number: A numeric field (e.g.,
Committed_Seats,Included_API_Quota).

Special Subscription PropertiesTwo subscription properties are generated automatically, not defined by hand:
- Date — generated on every Pricing Template, regardless of what else is configured.
- A Yes/No property per Meter Property — generated automatically whenever a Meter Property is added (Step 7), flagging whether that cycle’s reading was estimated rather than actual.
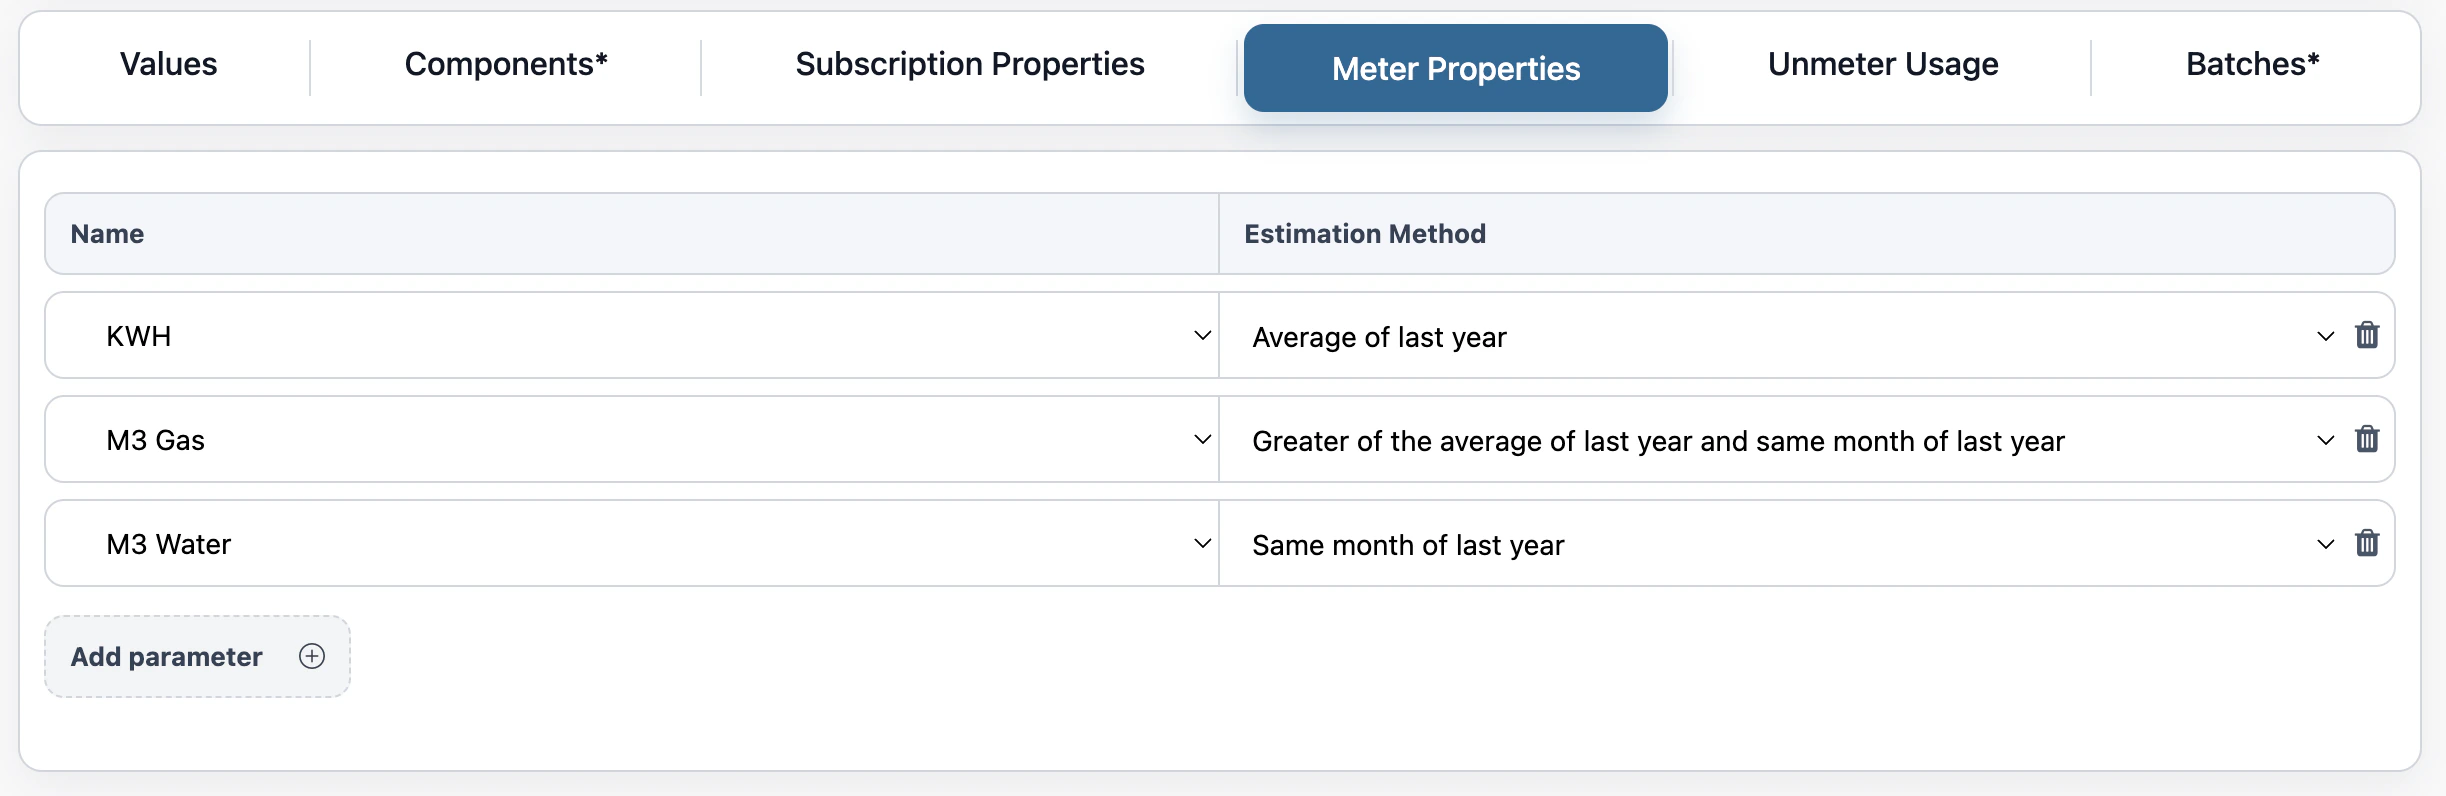
Step 7: Configure Metered Usage (The “Meter Properties” Tab)
Click on the Meter Properties tab. Define the tracking hooks to receive final readings from a physical or digital meter where continuous/odometer tracking is involved. The currently supported meter property types are:- KWH
- Off-Peak Units
- Peak Units
- Cubic Meter Water
- Cubic Meter Gas
Net Consumption = Current Cycle Final Reading - Previous Cycle Final Reading).
- Example: An energy meter reads
15,000 kWhthis month. Last month it read14,200 kWh. The billing engine rates the net800 kWh.
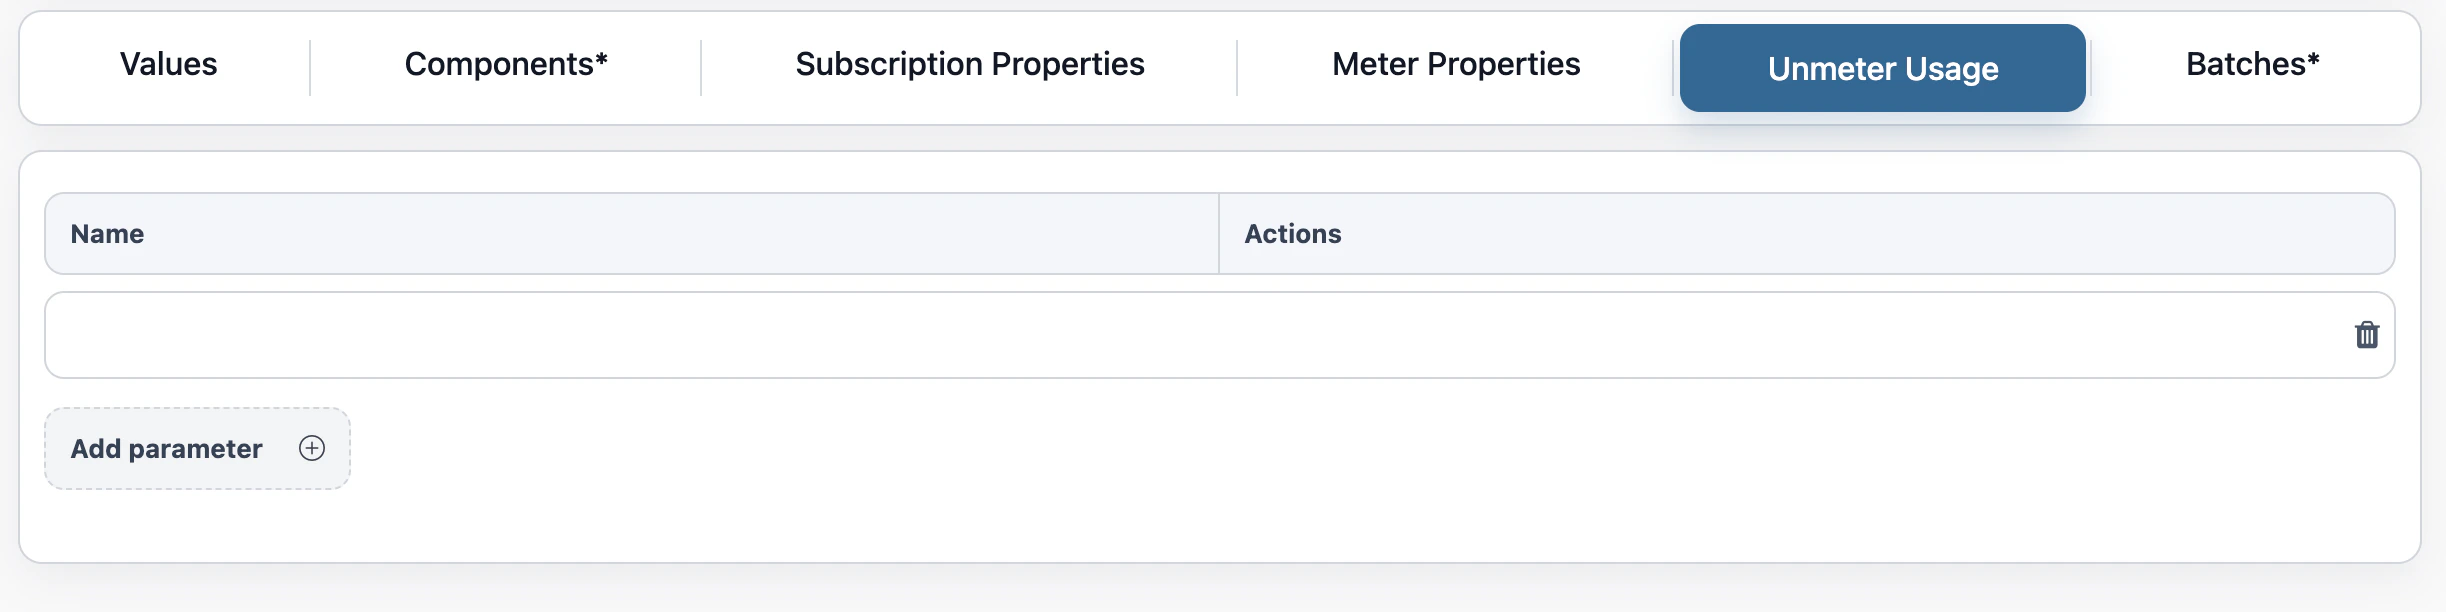
Step 8: Configure Unmetered Usage (The “Unmetered Usage” Tab)
Click on the Unmetered Usage tab. Set up hooks to receive direct, already calculated consumption amounts (delta usage) where no continuous meter is involved:- Since the provided data is already the net consumption volume, the billing engine does not need to perform any subtraction or difference calculations.
- Examples: Receiving a direct record of
50 GBof bandwidth consumed or10 hoursof support time delivered during the billing period.
3. Lifecycle Management
A Pricing Template has only two states:| State | Description |
|---|---|
| Created | The template exists and is immediately valid—the mandatory Subtotal, Late Payment, and Net Total flags are required at creation, so there’s no partial or draft state. Pricing Modules can be built on it right away. |
| Archived | The template is deactivated. All subscriptions tied to it must be deactivated first—archiving is blocked until every Pricing Module built on this template has no active subscriptions left. Once archived, no new Pricing Modules or subscriptions can be created from it. |
4. Editing an Existing Template
A Created template isn’t frozen. Each structural pillar has its own rules for what can change afterward. Name and Code: Locked once created. Only the Description can be edited afterward. Default Invoice Template and Default Email Template:- Both can be updated freely at any time.
- Order can be changed.
- New Values or Components can be added.
- Existing ones can be deactivated (not deleted)—except whichever component carries the Subtotal, Late Payment, or Net Total flag. Those three can never be deactivated, since the template would no longer satisfy its mandatory requirement. Unlike reordering, deactivation does not break existing Pricing Modules.
- For Components specifically, Calculation Type (Manual/Calculated) and Payment Priority can also be updated directly.
- New Subscription Properties can be added.
- For List-type properties, new values can be added to an existing list.
- Locked once created. None can be added, and none can be edited.
- The only thing that can change is the estimation method assigned to an existing Meter Property.
- New Unmetered Usage entries can be added after creation, unlike Meter Properties.