> ## Documentation Index
> Fetch the complete documentation index at: https://docs.techfootintl.com/llms.txt
> Use this file to discover all available pages before exploring further.
# Customers
> Learn how to create and manage customers in BillSpree.
A **Customer** in BillSpree represents an individual or a business entity that subscribes to your services. Each customer record stores critical billing information, contact details, and unique identifiers used to generate accurate invoices and manage subscriptions.
***
## **List View Customer**
Managing customers in BillSpree is a straightforward process. You can view your entire customer base from the list view and add new customers using the creation form.
### **1. Navigate to Customers**
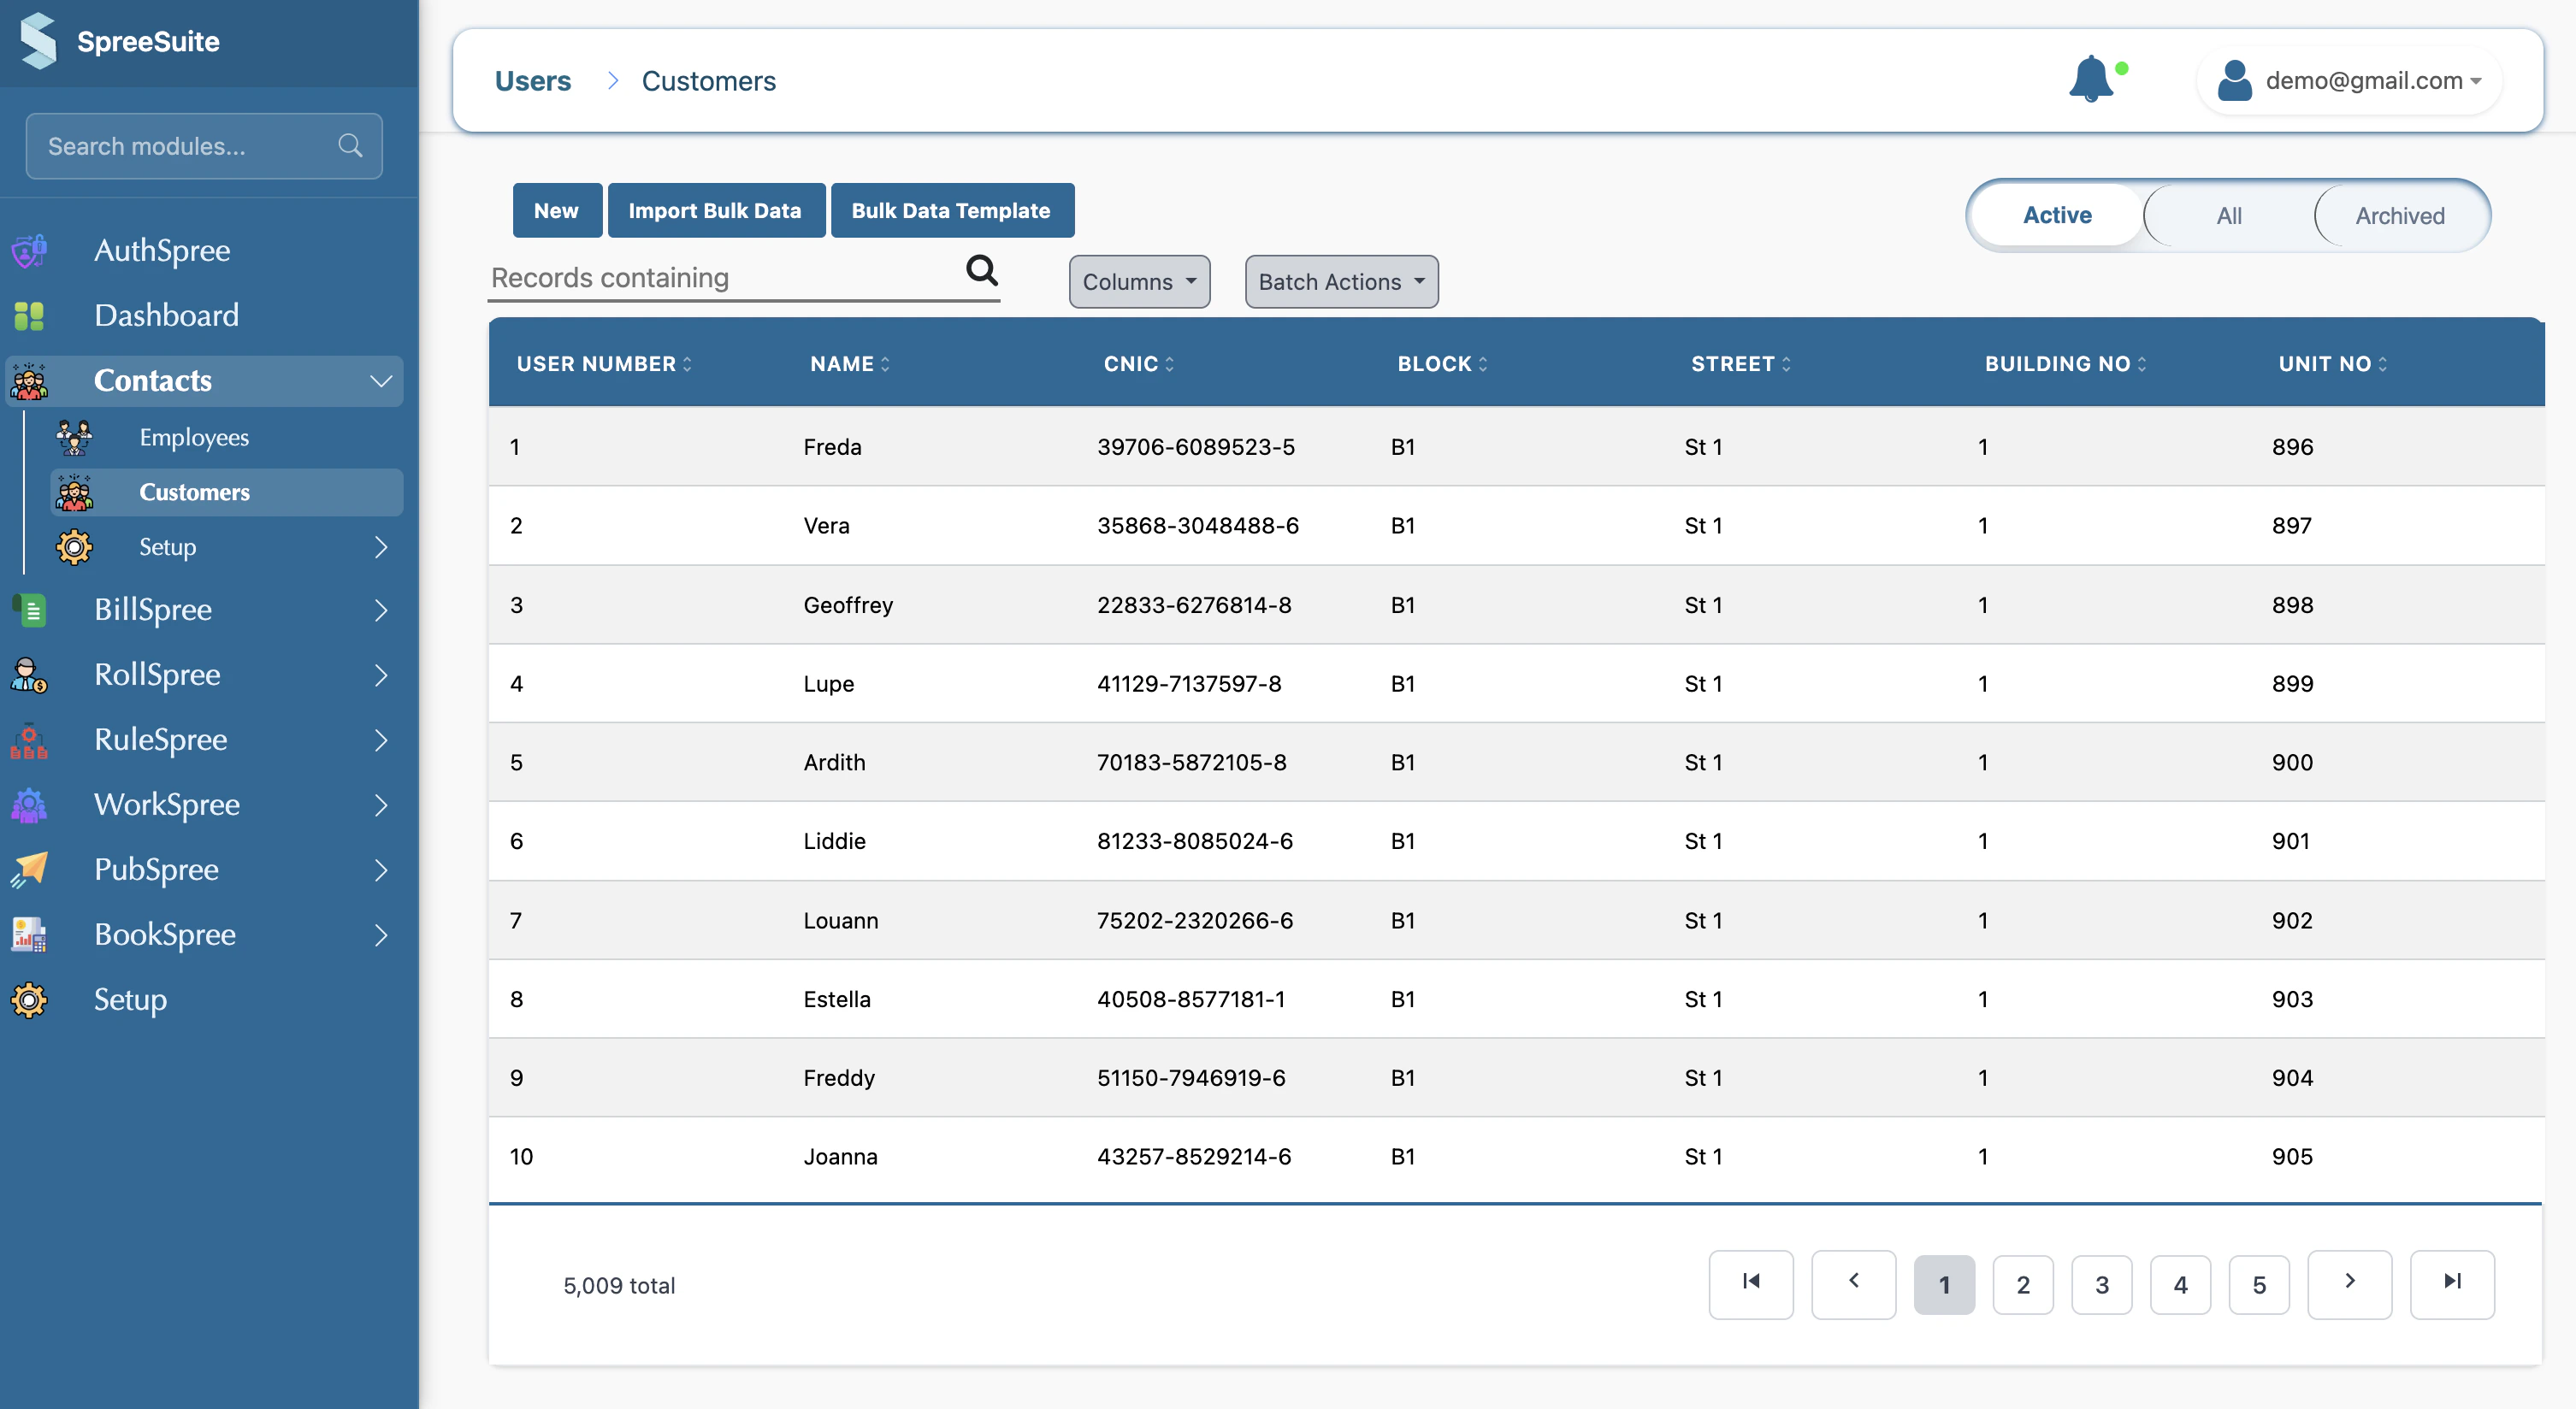
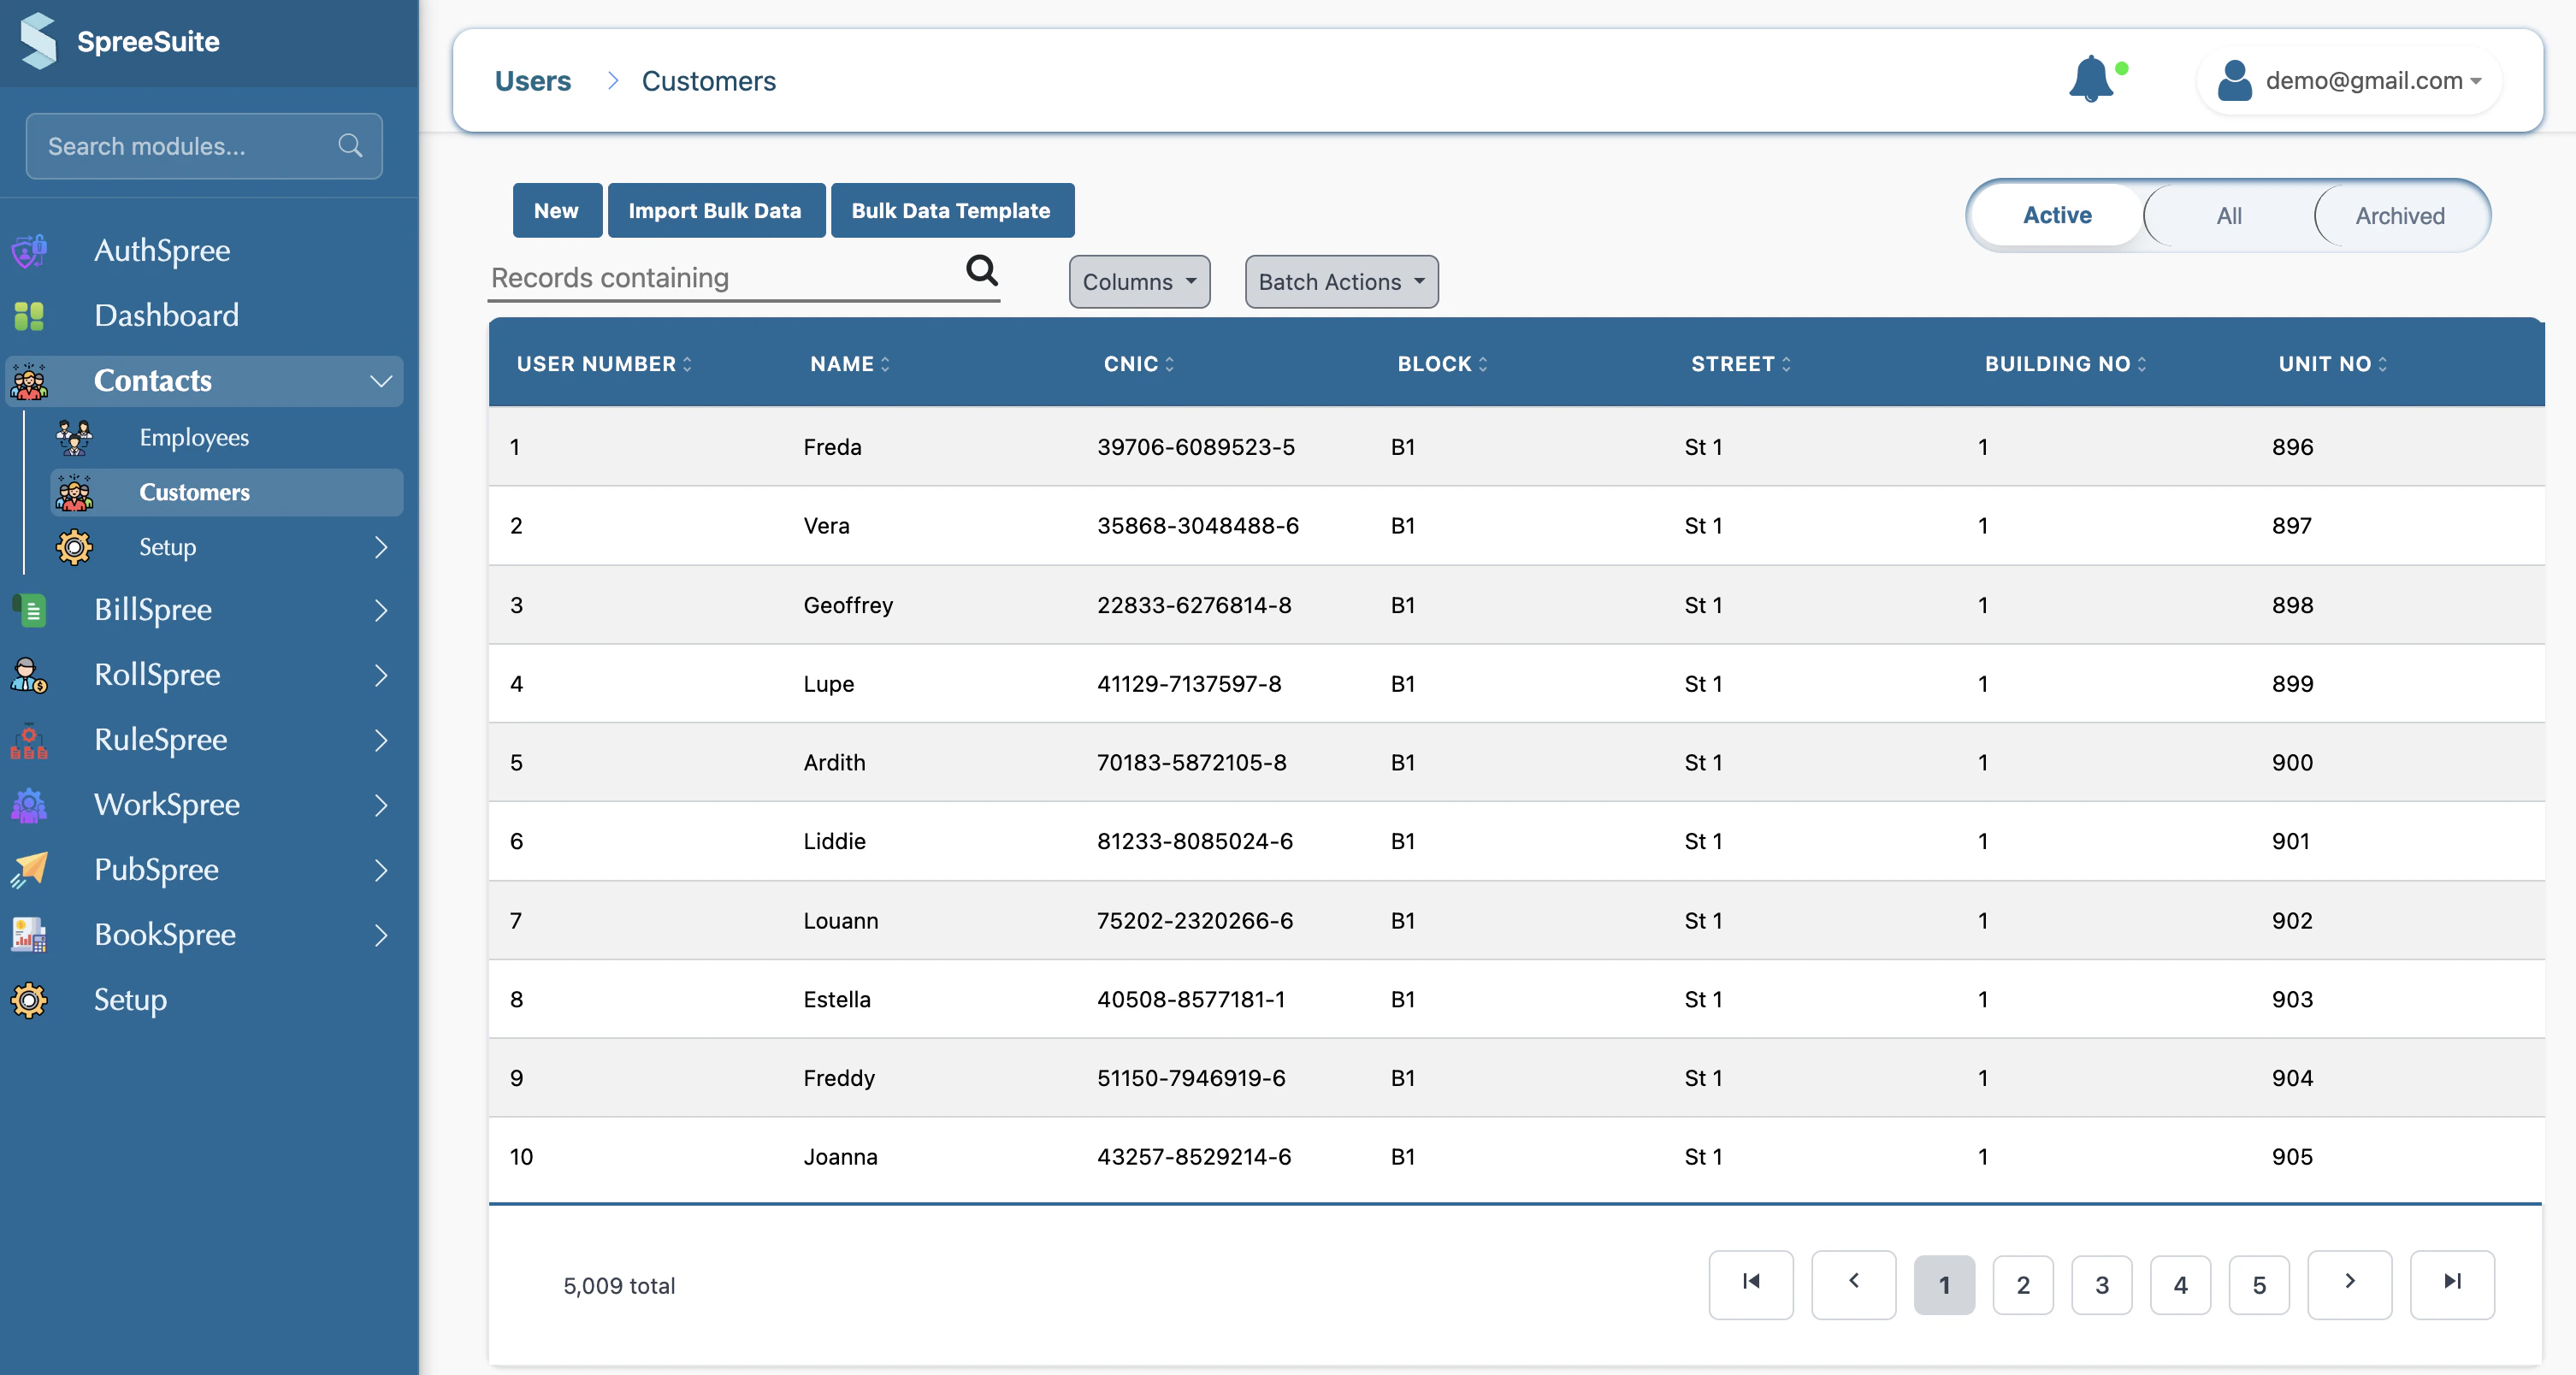
To access your customer list, click on **Customers** in the main sidebar. This page provides a high-level overview of all users registered in your system.
 ### **2. Add a New Customer**
To add a new customer, follow these steps:
Click the **+ New** button in the top right corner of the Customers page.
### **2. Add a New Customer**
To add a new customer, follow these steps:
Click the **+ New** button in the top right corner of the Customers page.
 Fill in the basic contact details for the customer.
 * **Name**: The full name of the customer (Required).
* **Email**: The customer's primary email address for invoicing.
* **Phone Number**: A contact number for the customer.
* **Reference Number**: Your own internal identifier if applicable.
This section is crucial for tax compliance and accurate invoice delivery.
* **Name**: The full name of the customer (Required).
* **Email**: The customer's primary email address for invoicing.
* **Phone Number**: A contact number for the customer.
* **Reference Number**: Your own internal identifier if applicable.
This section is crucial for tax compliance and accurate invoice delivery.
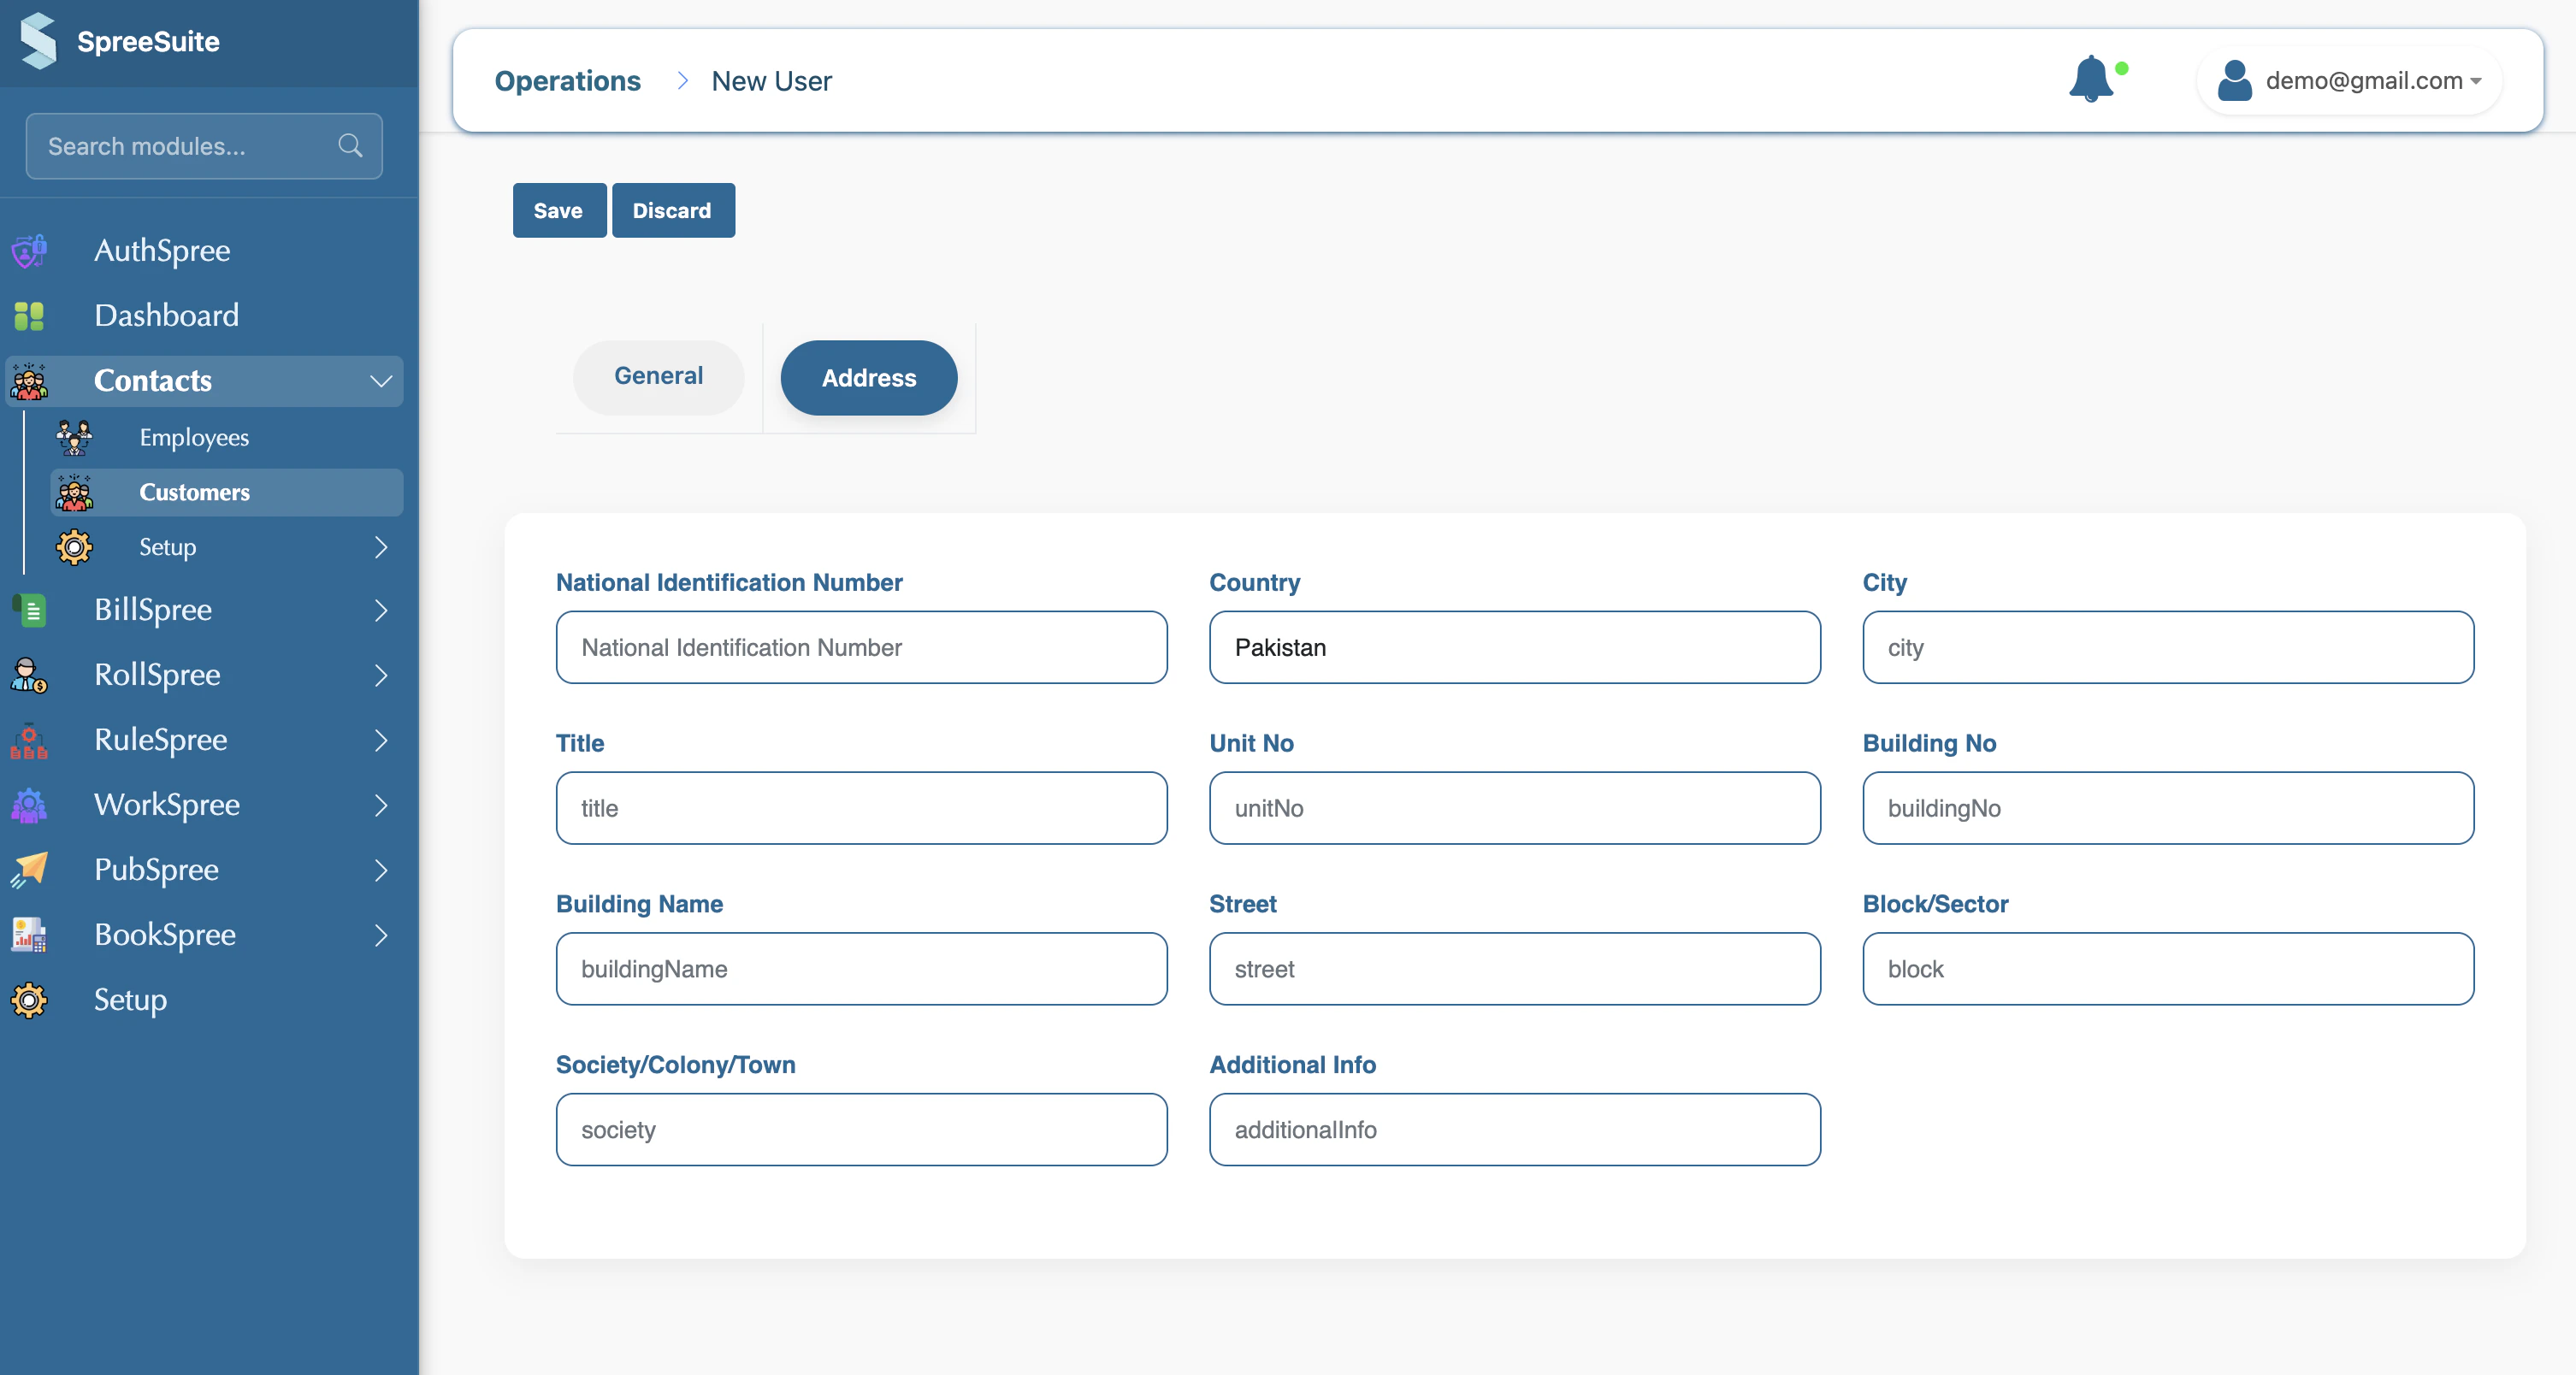 * **CNIC**: National identity number (if applicable in your region).
* **Country**: Select the customer's country.
* *Note: Other fields like Shop/Unit No, Building Name, and Street help in pinpointing the exact billing address.*
Once all details are filled, click the **Save** button. The customer will now appear in your list and can be linked to a subscription.
***
## **Detailed Field Guide**
### **1. General Information**
| Field | Description | Requirement |
| :------------------- | :------------------------------------------ | :---------- |
| **Name** | Full name of the individual or business. | Required |
| **Email** | Primary email for digital invoice delivery. | Optional |
| **Phone Number** | Primary contact number. | Optional |
| **Reference Number** | A unique ID from your legacy system or CRM. | Optional |
### **2. Address Information**
| Field | Description |
| :------------------- | :---------------------------------------------- |
| **CNIC** | Customer's National Identity Card number. |
| **Title** | A label for the address (e.g., Home, Office). |
| **Shop / Unit No** | Specific unit or shop number within a building. |
| **Building Name** | Name or number of the building/complex. |
| **Street** | Name of the street or road. |
| **Block / Sector** | Area designation within a city. |
| **Society / Colony** | Broad neighborhood or township name. |
| **Additional Info** | Any extra details for the delivery team. |
***
## **Importing Customers in Bulk**
For large-scale onboarding, you can import customers efficiently using a CSV template. This process allows you to add hundreds of customers in a single action.
### **1. The Bulk Import Workflow**
Follow these steps to successfully import your customer data:
In the **Customers** dashboard, click on the **Bulk Data Template** button. This will download a standard `customer.csv` file with all the required headers.
* **CNIC**: National identity number (if applicable in your region).
* **Country**: Select the customer's country.
* *Note: Other fields like Shop/Unit No, Building Name, and Street help in pinpointing the exact billing address.*
Once all details are filled, click the **Save** button. The customer will now appear in your list and can be linked to a subscription.
***
## **Detailed Field Guide**
### **1. General Information**
| Field | Description | Requirement |
| :------------------- | :------------------------------------------ | :---------- |
| **Name** | Full name of the individual or business. | Required |
| **Email** | Primary email for digital invoice delivery. | Optional |
| **Phone Number** | Primary contact number. | Optional |
| **Reference Number** | A unique ID from your legacy system or CRM. | Optional |
### **2. Address Information**
| Field | Description |
| :------------------- | :---------------------------------------------- |
| **CNIC** | Customer's National Identity Card number. |
| **Title** | A label for the address (e.g., Home, Office). |
| **Shop / Unit No** | Specific unit or shop number within a building. |
| **Building Name** | Name or number of the building/complex. |
| **Street** | Name of the street or road. |
| **Block / Sector** | Area designation within a city. |
| **Society / Colony** | Broad neighborhood or township name. |
| **Additional Info** | Any extra details for the delivery team. |
***
## **Importing Customers in Bulk**
For large-scale onboarding, you can import customers efficiently using a CSV template. This process allows you to add hundreds of customers in a single action.
### **1. The Bulk Import Workflow**
Follow these steps to successfully import your customer data:
In the **Customers** dashboard, click on the **Bulk Data Template** button. This will download a standard `customer.csv` file with all the required headers.
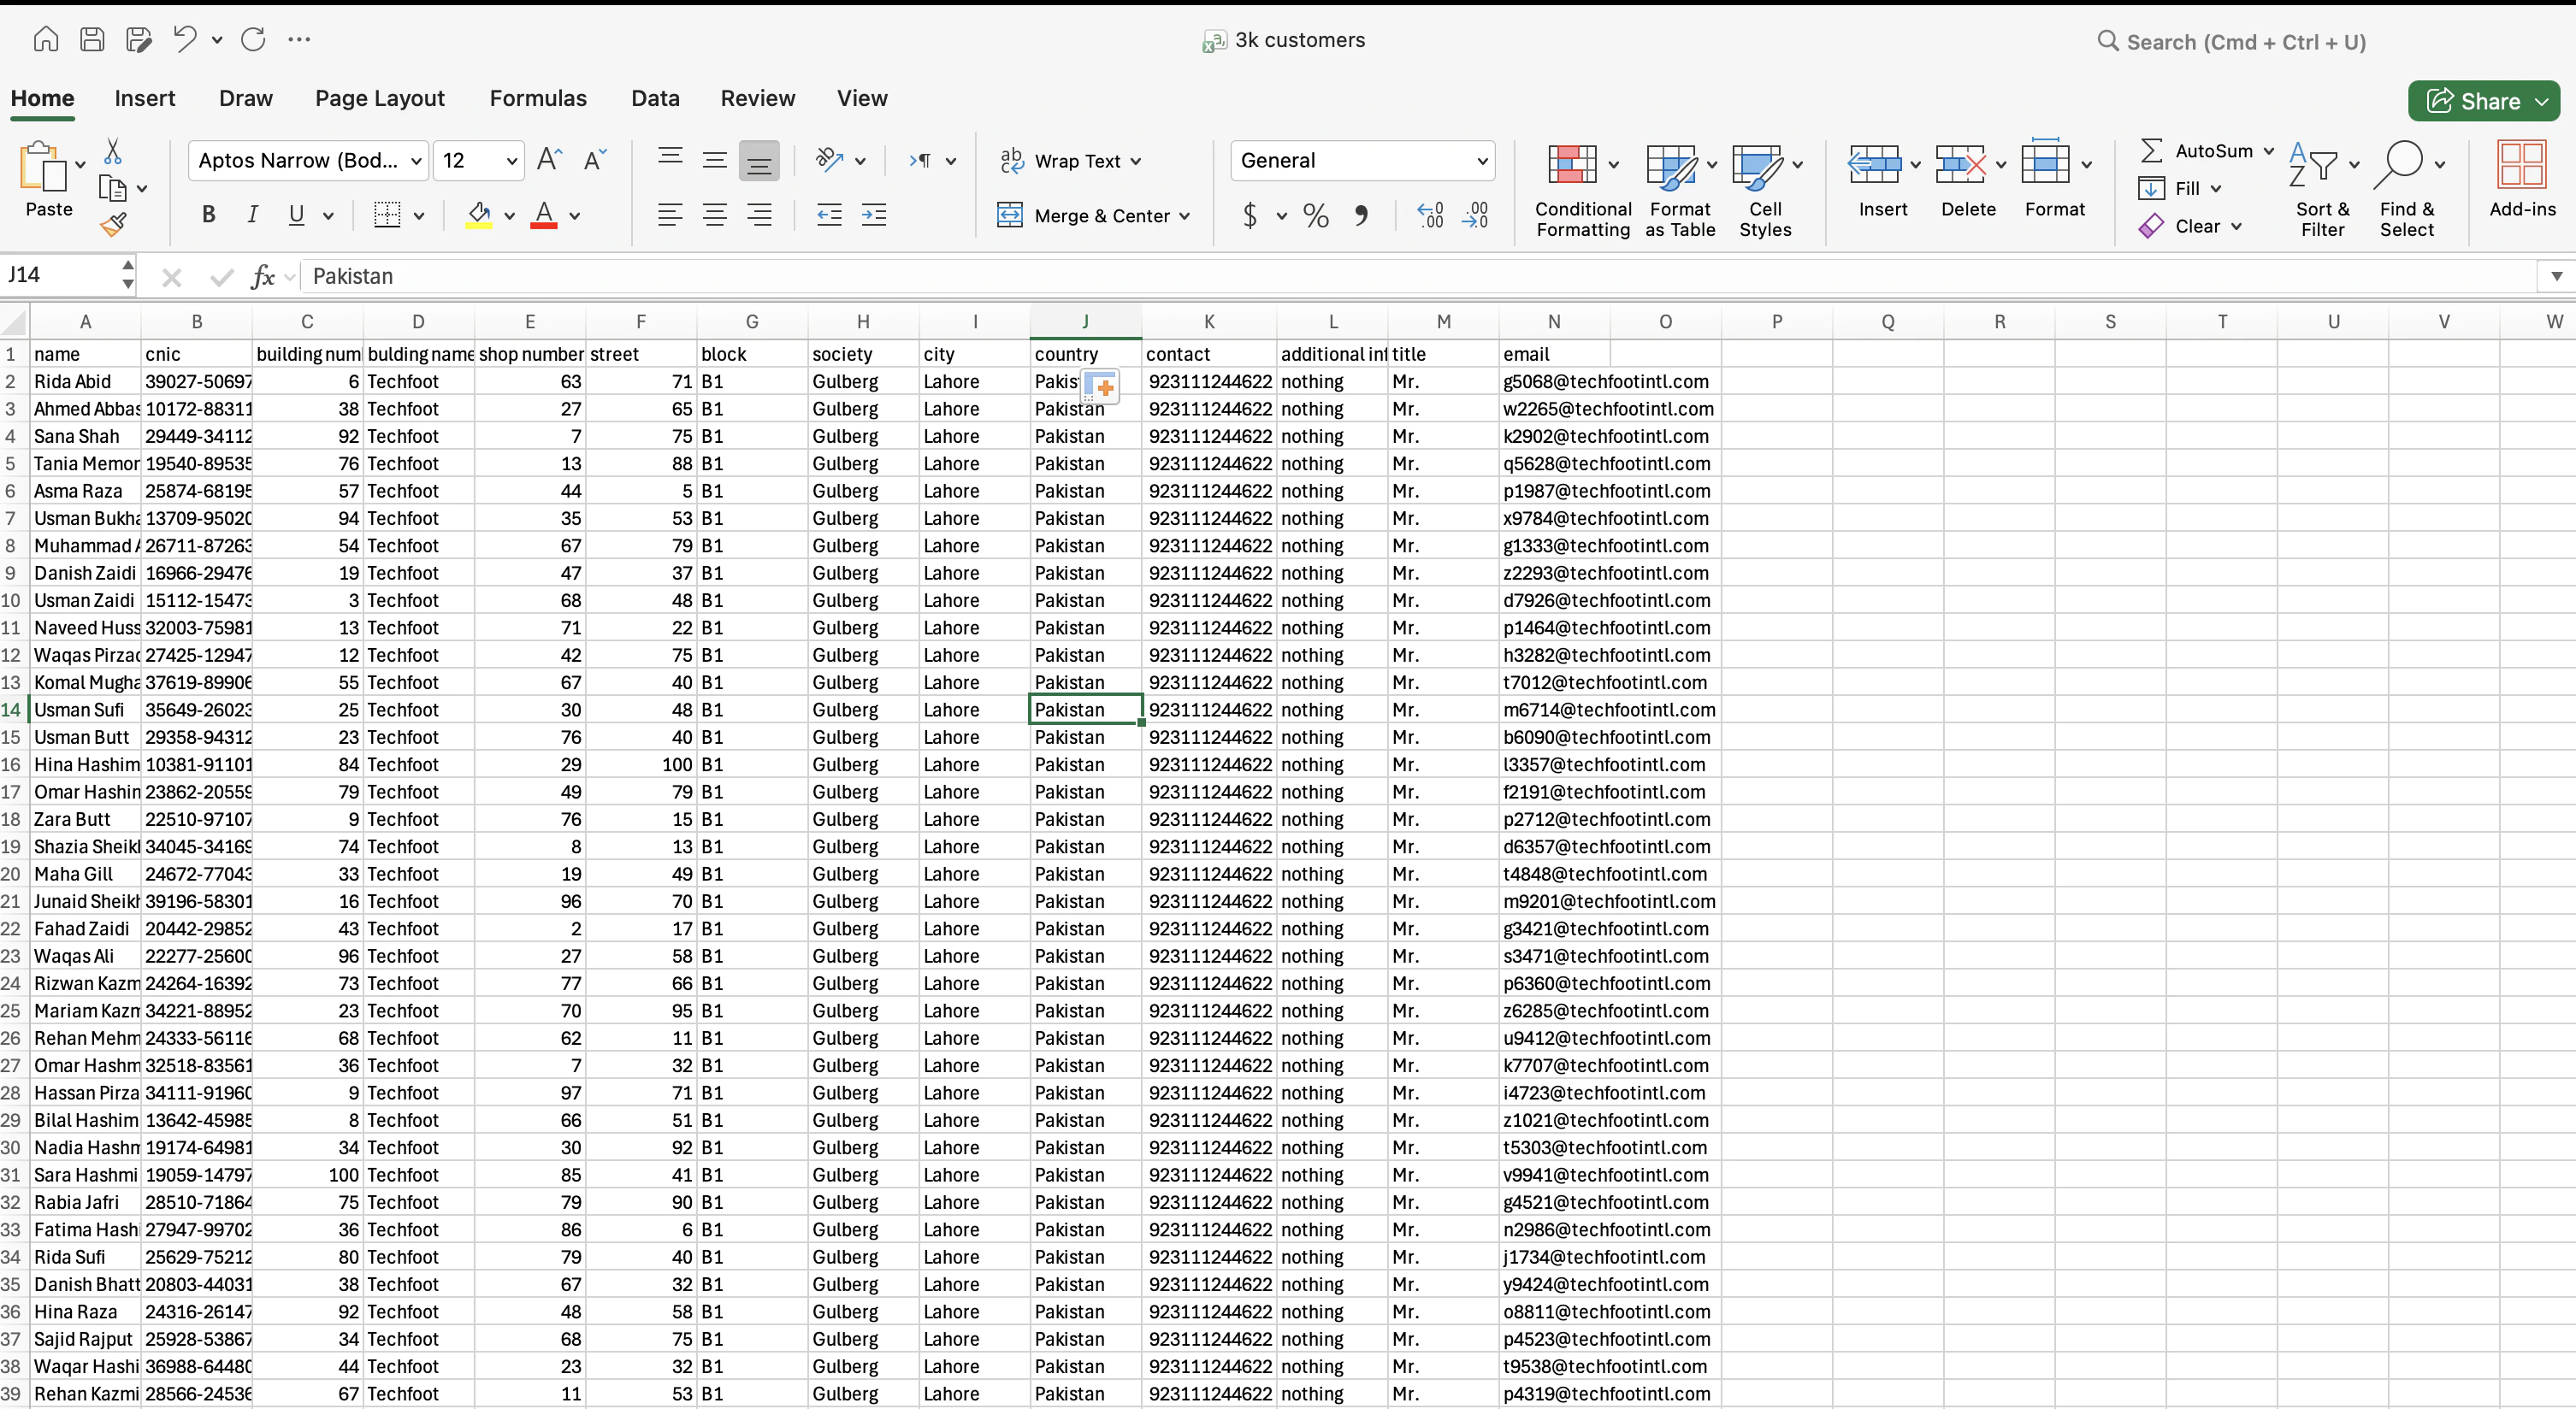 Open the downloaded file in a spreadsheet application (like Excel or Google Sheets). Fill in the columns as per the headers:
* **Mandatory Fields**: Ensure the `name` column is populated for every row.
* **Optional Details**: You can provide `cnic`, `email`, `contact`, and detailed address information (`building_name`, `street`, `city`, etc.).
* **Identifiers**: Add `reference_number` if you are migrating from another system.
Once your file is ready, go back to the BillSpree **Customers** page and:
1. Click the **Import Bulk Data** button.
2. Select your filled `customer.csv` file from your device.
3. Click **Upload** to process the data.
Before uploading, double-check that your CSV file follows the correct header format to ensure a smooth import process.
Open the downloaded file in a spreadsheet application (like Excel or Google Sheets). Fill in the columns as per the headers:
* **Mandatory Fields**: Ensure the `name` column is populated for every row.
* **Optional Details**: You can provide `cnic`, `email`, `contact`, and detailed address information (`building_name`, `street`, `city`, etc.).
* **Identifiers**: Add `reference_number` if you are migrating from another system.
Once your file is ready, go back to the BillSpree **Customers** page and:
1. Click the **Import Bulk Data** button.
2. Select your filled `customer.csv` file from your device.
3. Click **Upload** to process the data.
Before uploading, double-check that your CSV file follows the correct header format to ensure a smooth import process.