> ## Documentation Index
> Fetch the complete documentation index at: https://docs.techfootintl.com/llms.txt
> Use this file to discover all available pages before exploring further.
# Billing Account
## What is a billing account
A billing account is used to organize a customer’s subscriptions for billing.
In Billspree, billing accounts are created and managed from the customer profile. A customer can have one or more billing accounts, and each subscription can be linked to a billing account when the subscription is created.
If multiple subscriptions belong to the same billing account, they can be treated together for billing. If subscriptions need to be billed separately, create separate billing accounts and assign each subscription to the required account.
**Real-world example**
A customer may have multiple services:
* Electricity subscription
* Water subscription
* Gas subscription
If these subscriptions are assigned to the same billing account, they can be billed together.
If each service needs its own bill, create a separate billing account for each service.
***
## Billing account setup
Billing accounts are created from the customer details screen.
### 1. Open customer details
Go to the customer record and open the customer details page.
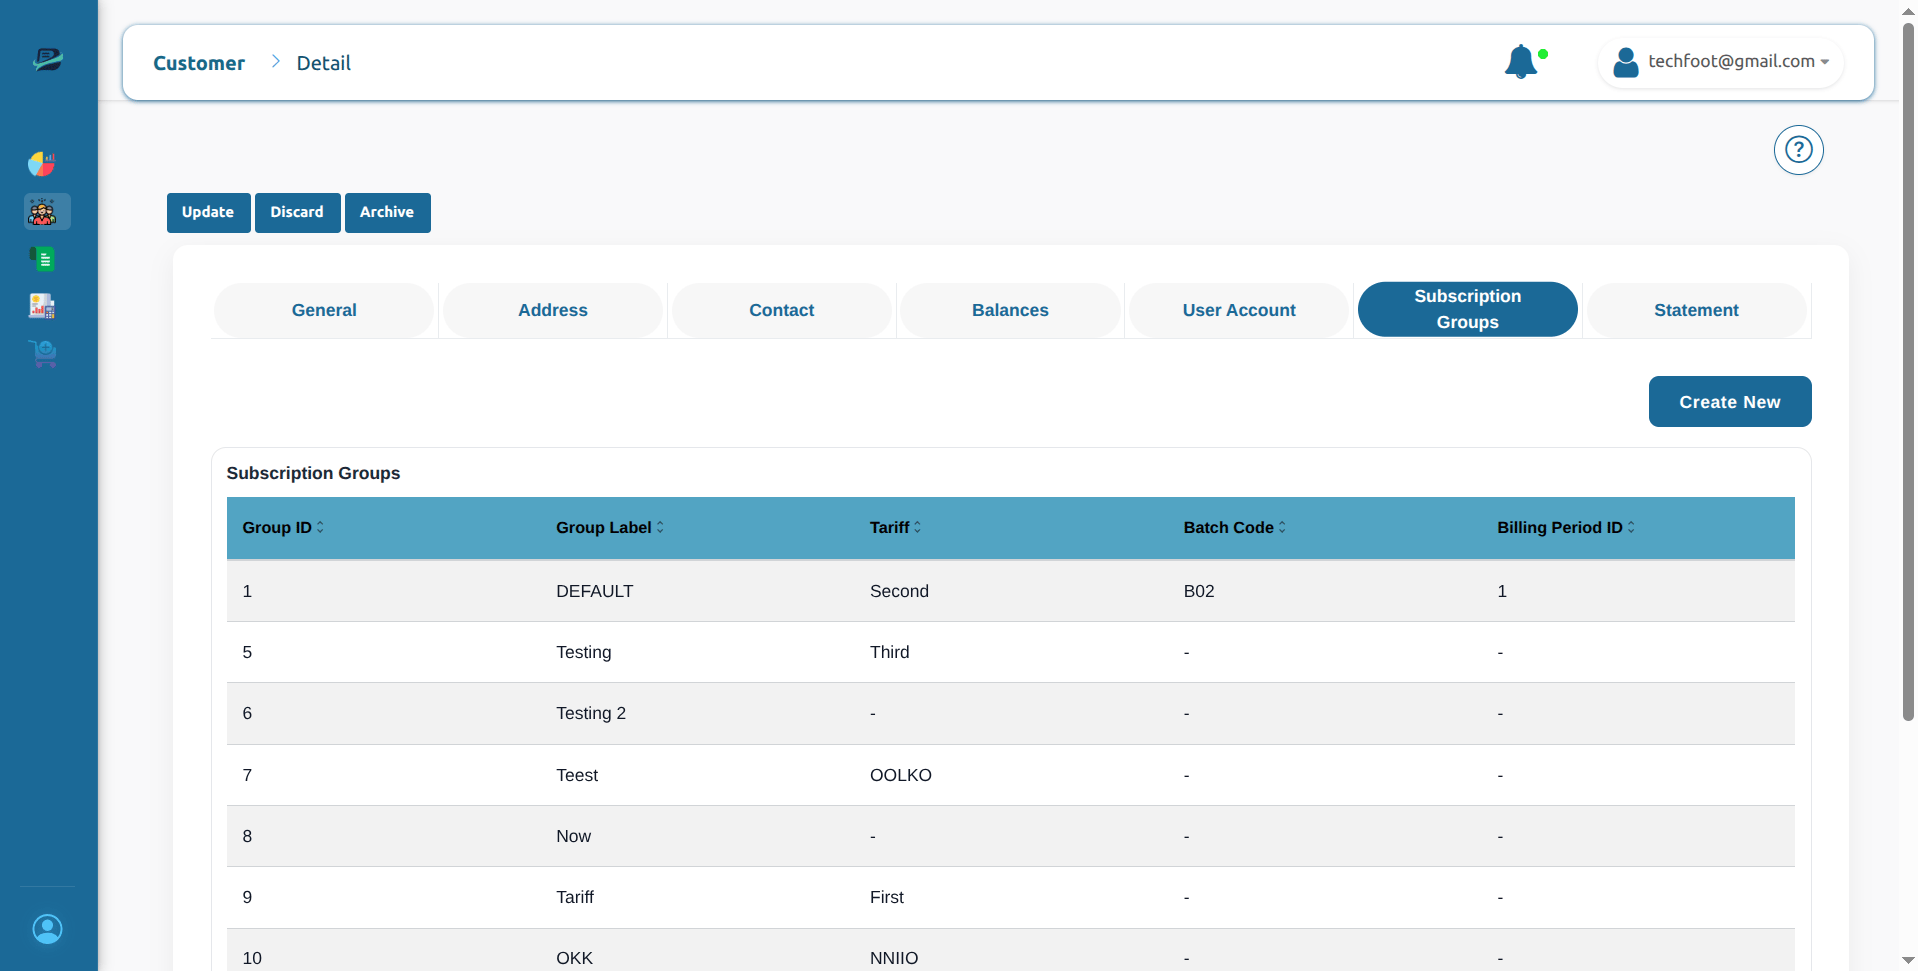
From the customer details page, click the **Billing Accounts** tab.
 ***
### 2. View billing accounts
The **Billing Accounts** tab shows all billing accounts linked with the selected customer.
The table displays:
| Column | Description |
| ----------------- | ------------------------------------------------ |
| Account ID | Unique ID of the billing account |
| Account Label | Name or label of the billing account |
| Plan | Plan assigned to the billing account |
| Batch Code | Billing batch connected with the billing account |
| Billing Period ID | Billing period linked with the billing account |
Click any billing account row to view the subscriptions inside that account.
***
### 3. View subscriptions inside an account
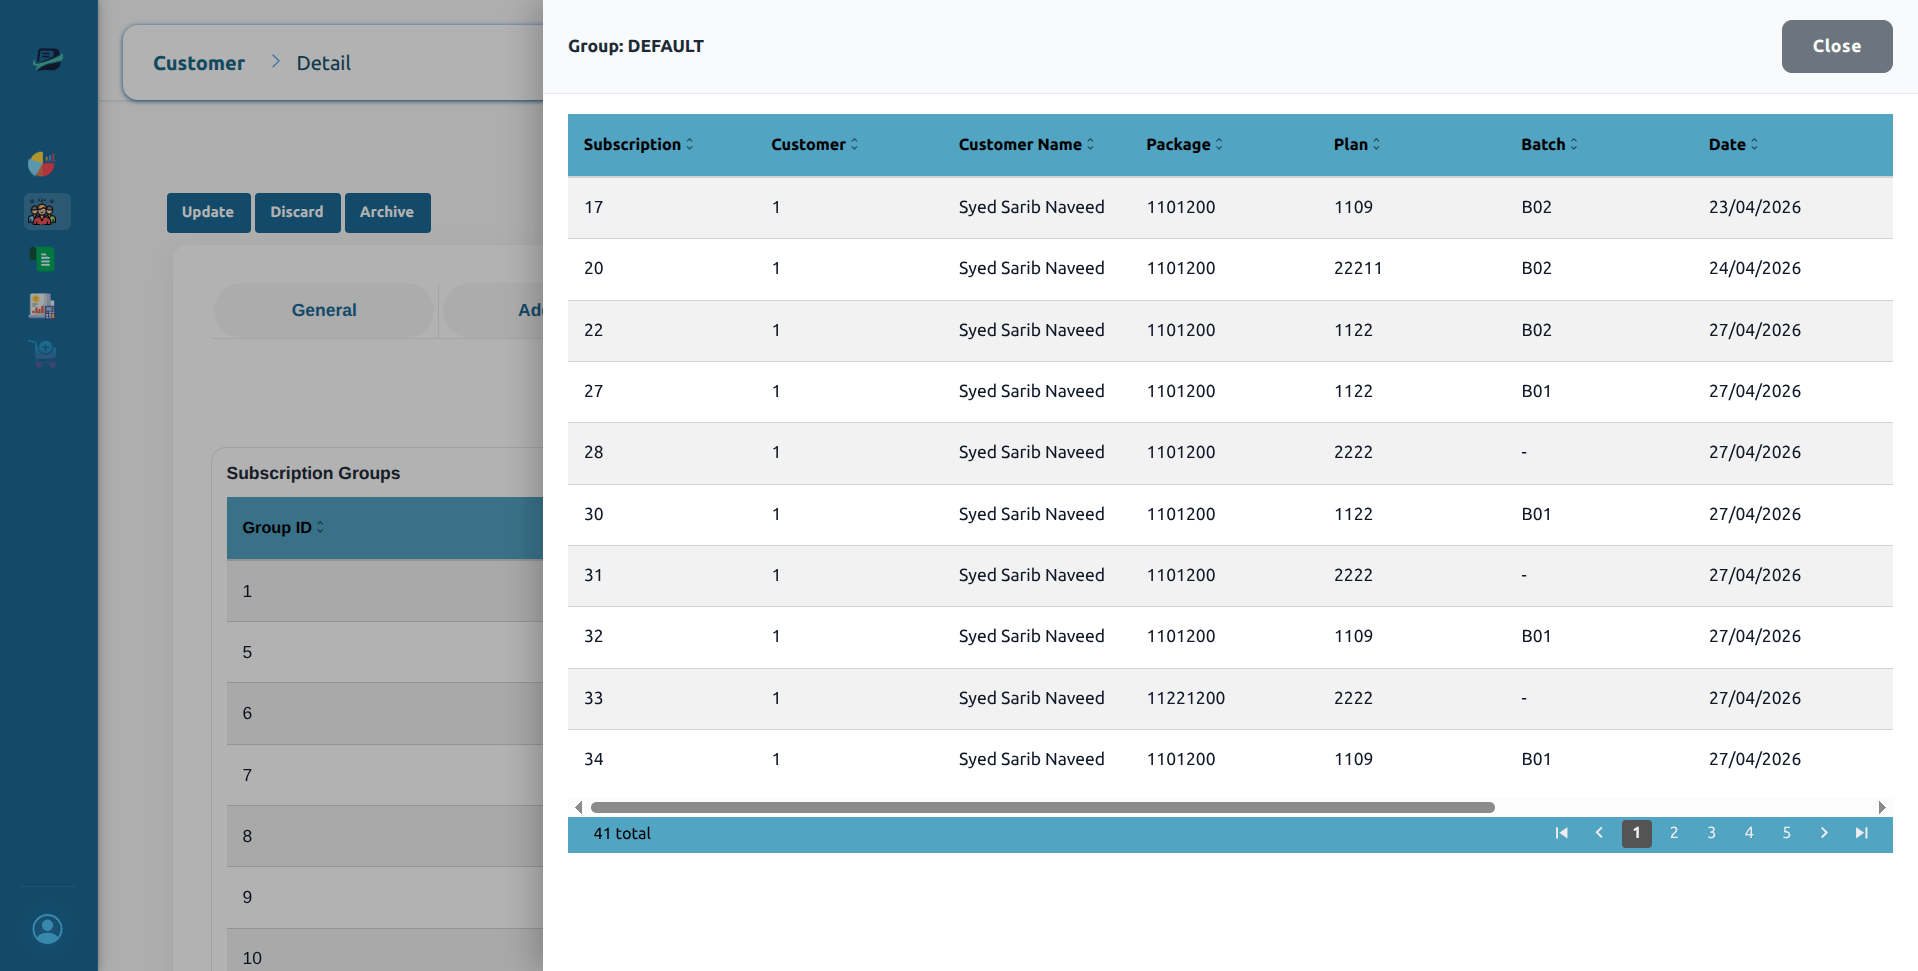
When you click a billing account row, a drawer opens from the side.
This drawer shows all subscriptions linked with the selected account.
The subscription list includes:
| Column | Description |
| --------------- | ----------------------- |
| Subscription | Subscription number |
| Customer | Customer number |
| Customer Name | Customer name |
| Package | Service package |
| Plan | Plan code |
| Batch | Batch code |
| Date | Subscription date |
| Status | Subscription status |
| Account | Subscription account ID |
| Billing Account | Account label |
***
### 2. View billing accounts
The **Billing Accounts** tab shows all billing accounts linked with the selected customer.
The table displays:
| Column | Description |
| ----------------- | ------------------------------------------------ |
| Account ID | Unique ID of the billing account |
| Account Label | Name or label of the billing account |
| Plan | Plan assigned to the billing account |
| Batch Code | Billing batch connected with the billing account |
| Billing Period ID | Billing period linked with the billing account |
Click any billing account row to view the subscriptions inside that account.
***
### 3. View subscriptions inside an account
When you click a billing account row, a drawer opens from the side.
This drawer shows all subscriptions linked with the selected account.
The subscription list includes:
| Column | Description |
| --------------- | ----------------------- |
| Subscription | Subscription number |
| Customer | Customer number |
| Customer Name | Customer name |
| Package | Service package |
| Plan | Plan code |
| Batch | Batch code |
| Date | Subscription date |
| Status | Subscription status |
| Account | Subscription account ID |
| Billing Account | Account label |
 ***
## Create a billing account
### 1. Click **Create New**
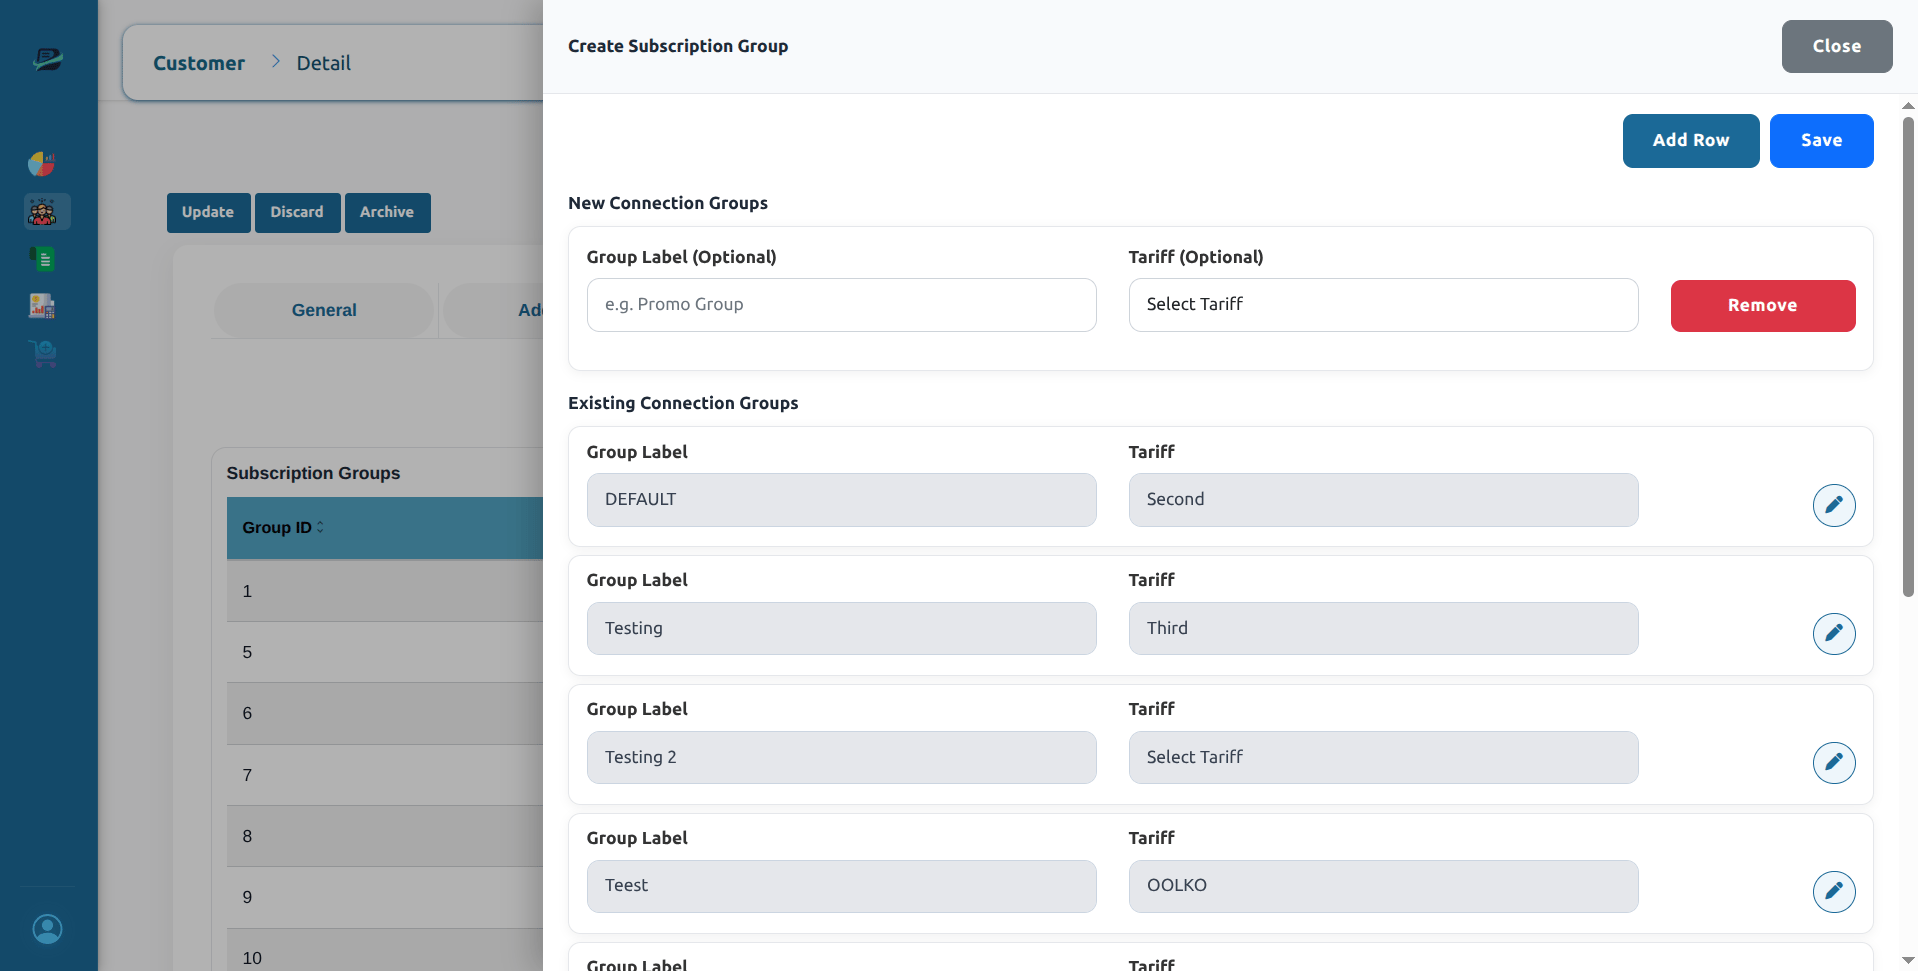
From the **Billing Accounts** tab, click **Create New**.
This opens the **Create Billing Account** drawer.
***
## Create a billing account
### 1. Click **Create New**
From the **Billing Accounts** tab, click **Create New**.
This opens the **Create Billing Account** drawer.
 ***
### 2. Add a new account row
Click **Add Row** to add a new billing account.
Each new account row contains:
| Field | Required | Description |
| ------------- | -------- | -------------------------------------------------------------------- |
| Account Label | Optional | A readable name for the billing account, for example `Promo Account` |
| Plan | Optional | Plan selected from the available plan list |
***
### 2. Add a new account row
Click **Add Row** to add a new billing account.
Each new account row contains:
| Field | Required | Description |
| ------------- | -------- | -------------------------------------------------------------------- |
| Account Label | Optional | A readable name for the billing account, for example `Promo Account` |
| Plan | Optional | Plan selected from the available plan list |
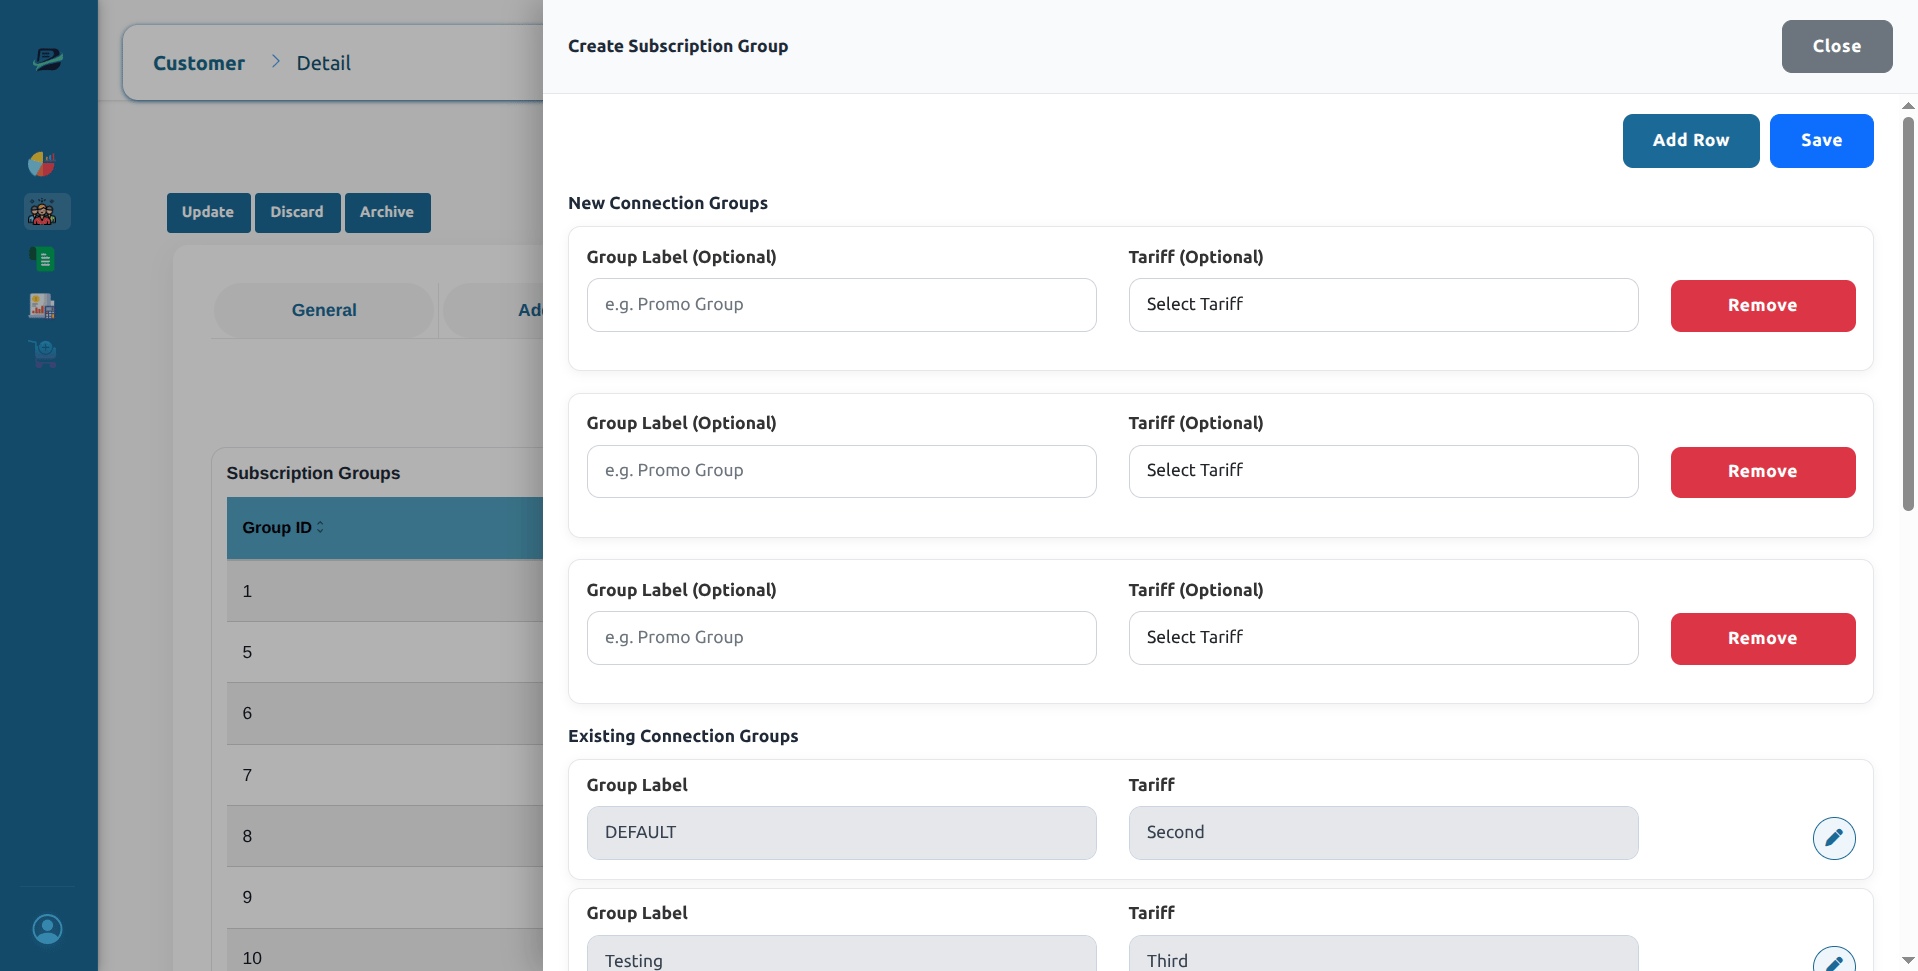 You can add multiple rows before saving.
To remove a row, click **Remove**.
***
### 3. Save billing accounts
After adding the required account rows, click **Save**.
If the account is saved successfully, the system shows:
```text theme={null}
Billing accounts saved successfully!
Now when Billing Accounts created accounts of subsTotal, lp, Tax1, Tax2, Tax3, Tax4, Tax5 created.
```
***
## Account settlements
The **Settlements** feature provides a consolidated, quick-access view of all financial accounts associated with a customer's billing accounts. This allows you to easily check balances and payment priorities without navigating away from the customer profile.
### 1. Access settlements
From the **Billing Accounts** tab, click the green **Settlements** button located at the top right, next to the **Create New** button.
You can add multiple rows before saving.
To remove a row, click **Remove**.
***
### 3. Save billing accounts
After adding the required account rows, click **Save**.
If the account is saved successfully, the system shows:
```text theme={null}
Billing accounts saved successfully!
Now when Billing Accounts created accounts of subsTotal, lp, Tax1, Tax2, Tax3, Tax4, Tax5 created.
```
***
## Account settlements
The **Settlements** feature provides a consolidated, quick-access view of all financial accounts associated with a customer's billing accounts. This allows you to easily check balances and payment priorities without navigating away from the customer profile.
### 1. Access settlements
From the **Billing Accounts** tab, click the green **Settlements** button located at the top right, next to the **Create New** button.
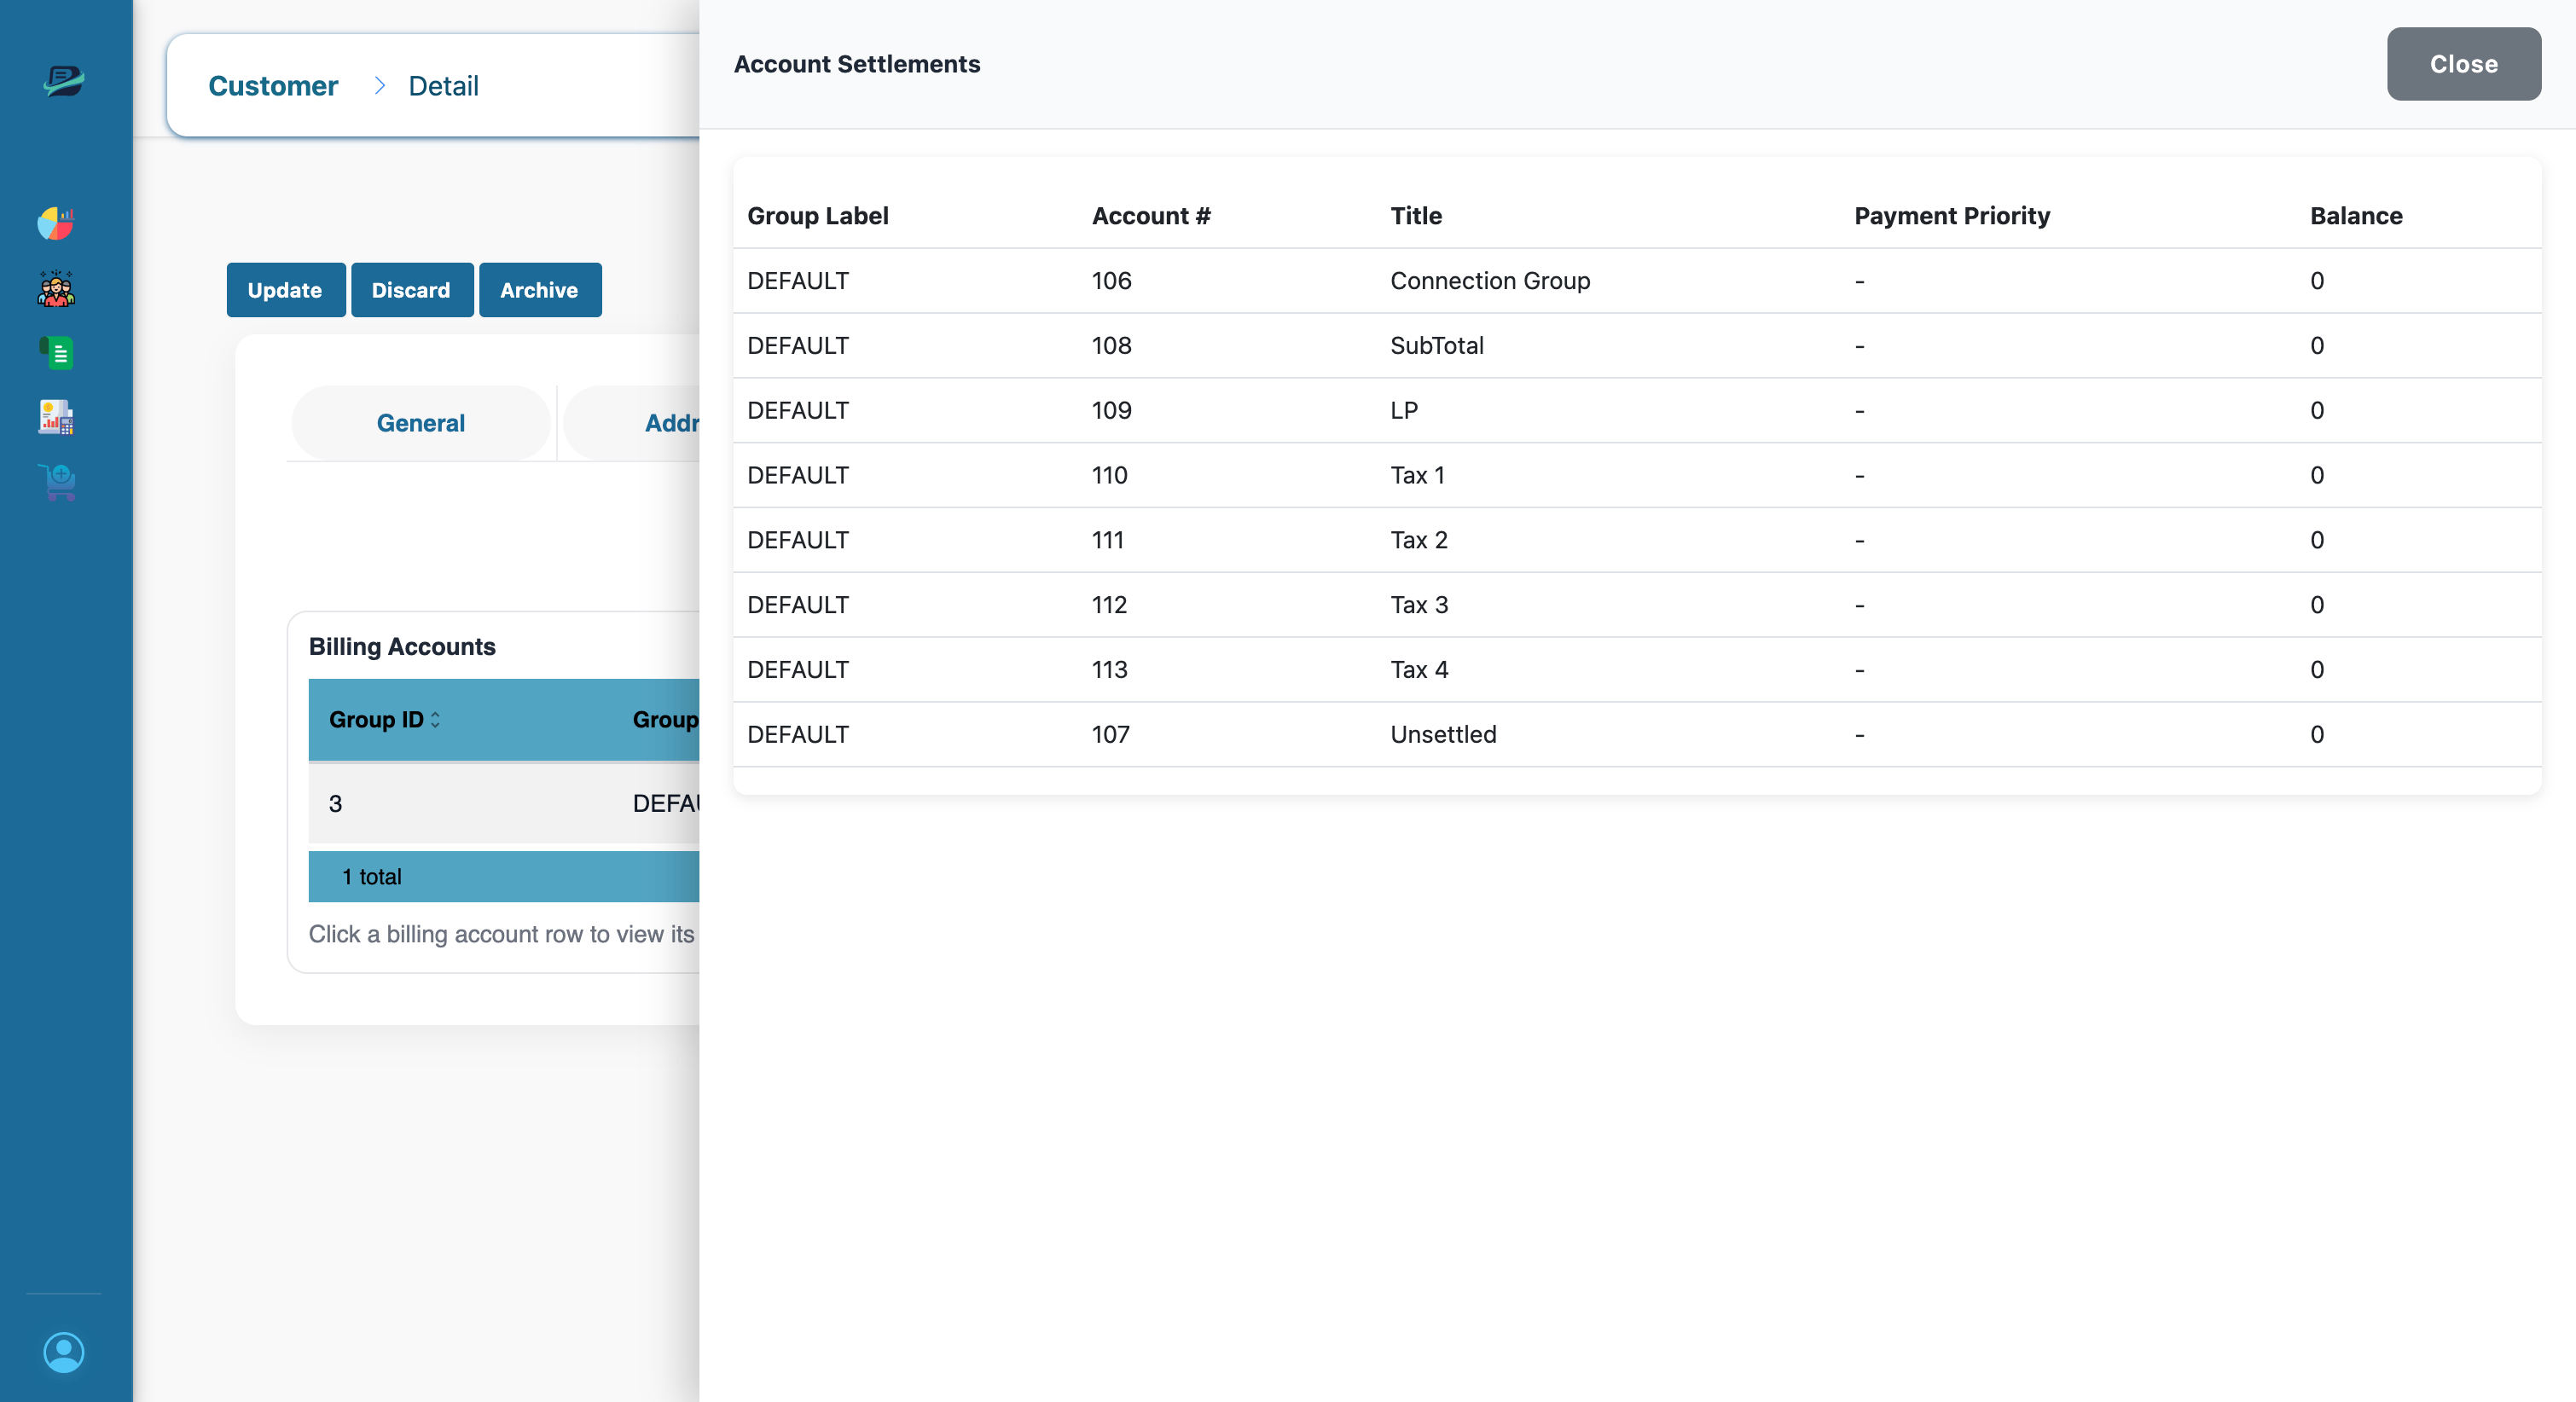 A right-hand side drawer titled **Account Settlements** slides into view.
***
### 2. View settlements
When you open the drawer, the system automatically identifies all active billing accounts for the current customer and fetches real-time financial details for the linked accounts.
A right-hand side drawer titled **Account Settlements** slides into view.
***
### 2. View settlements
When you open the drawer, the system automatically identifies all active billing accounts for the current customer and fetches real-time financial details for the linked accounts.
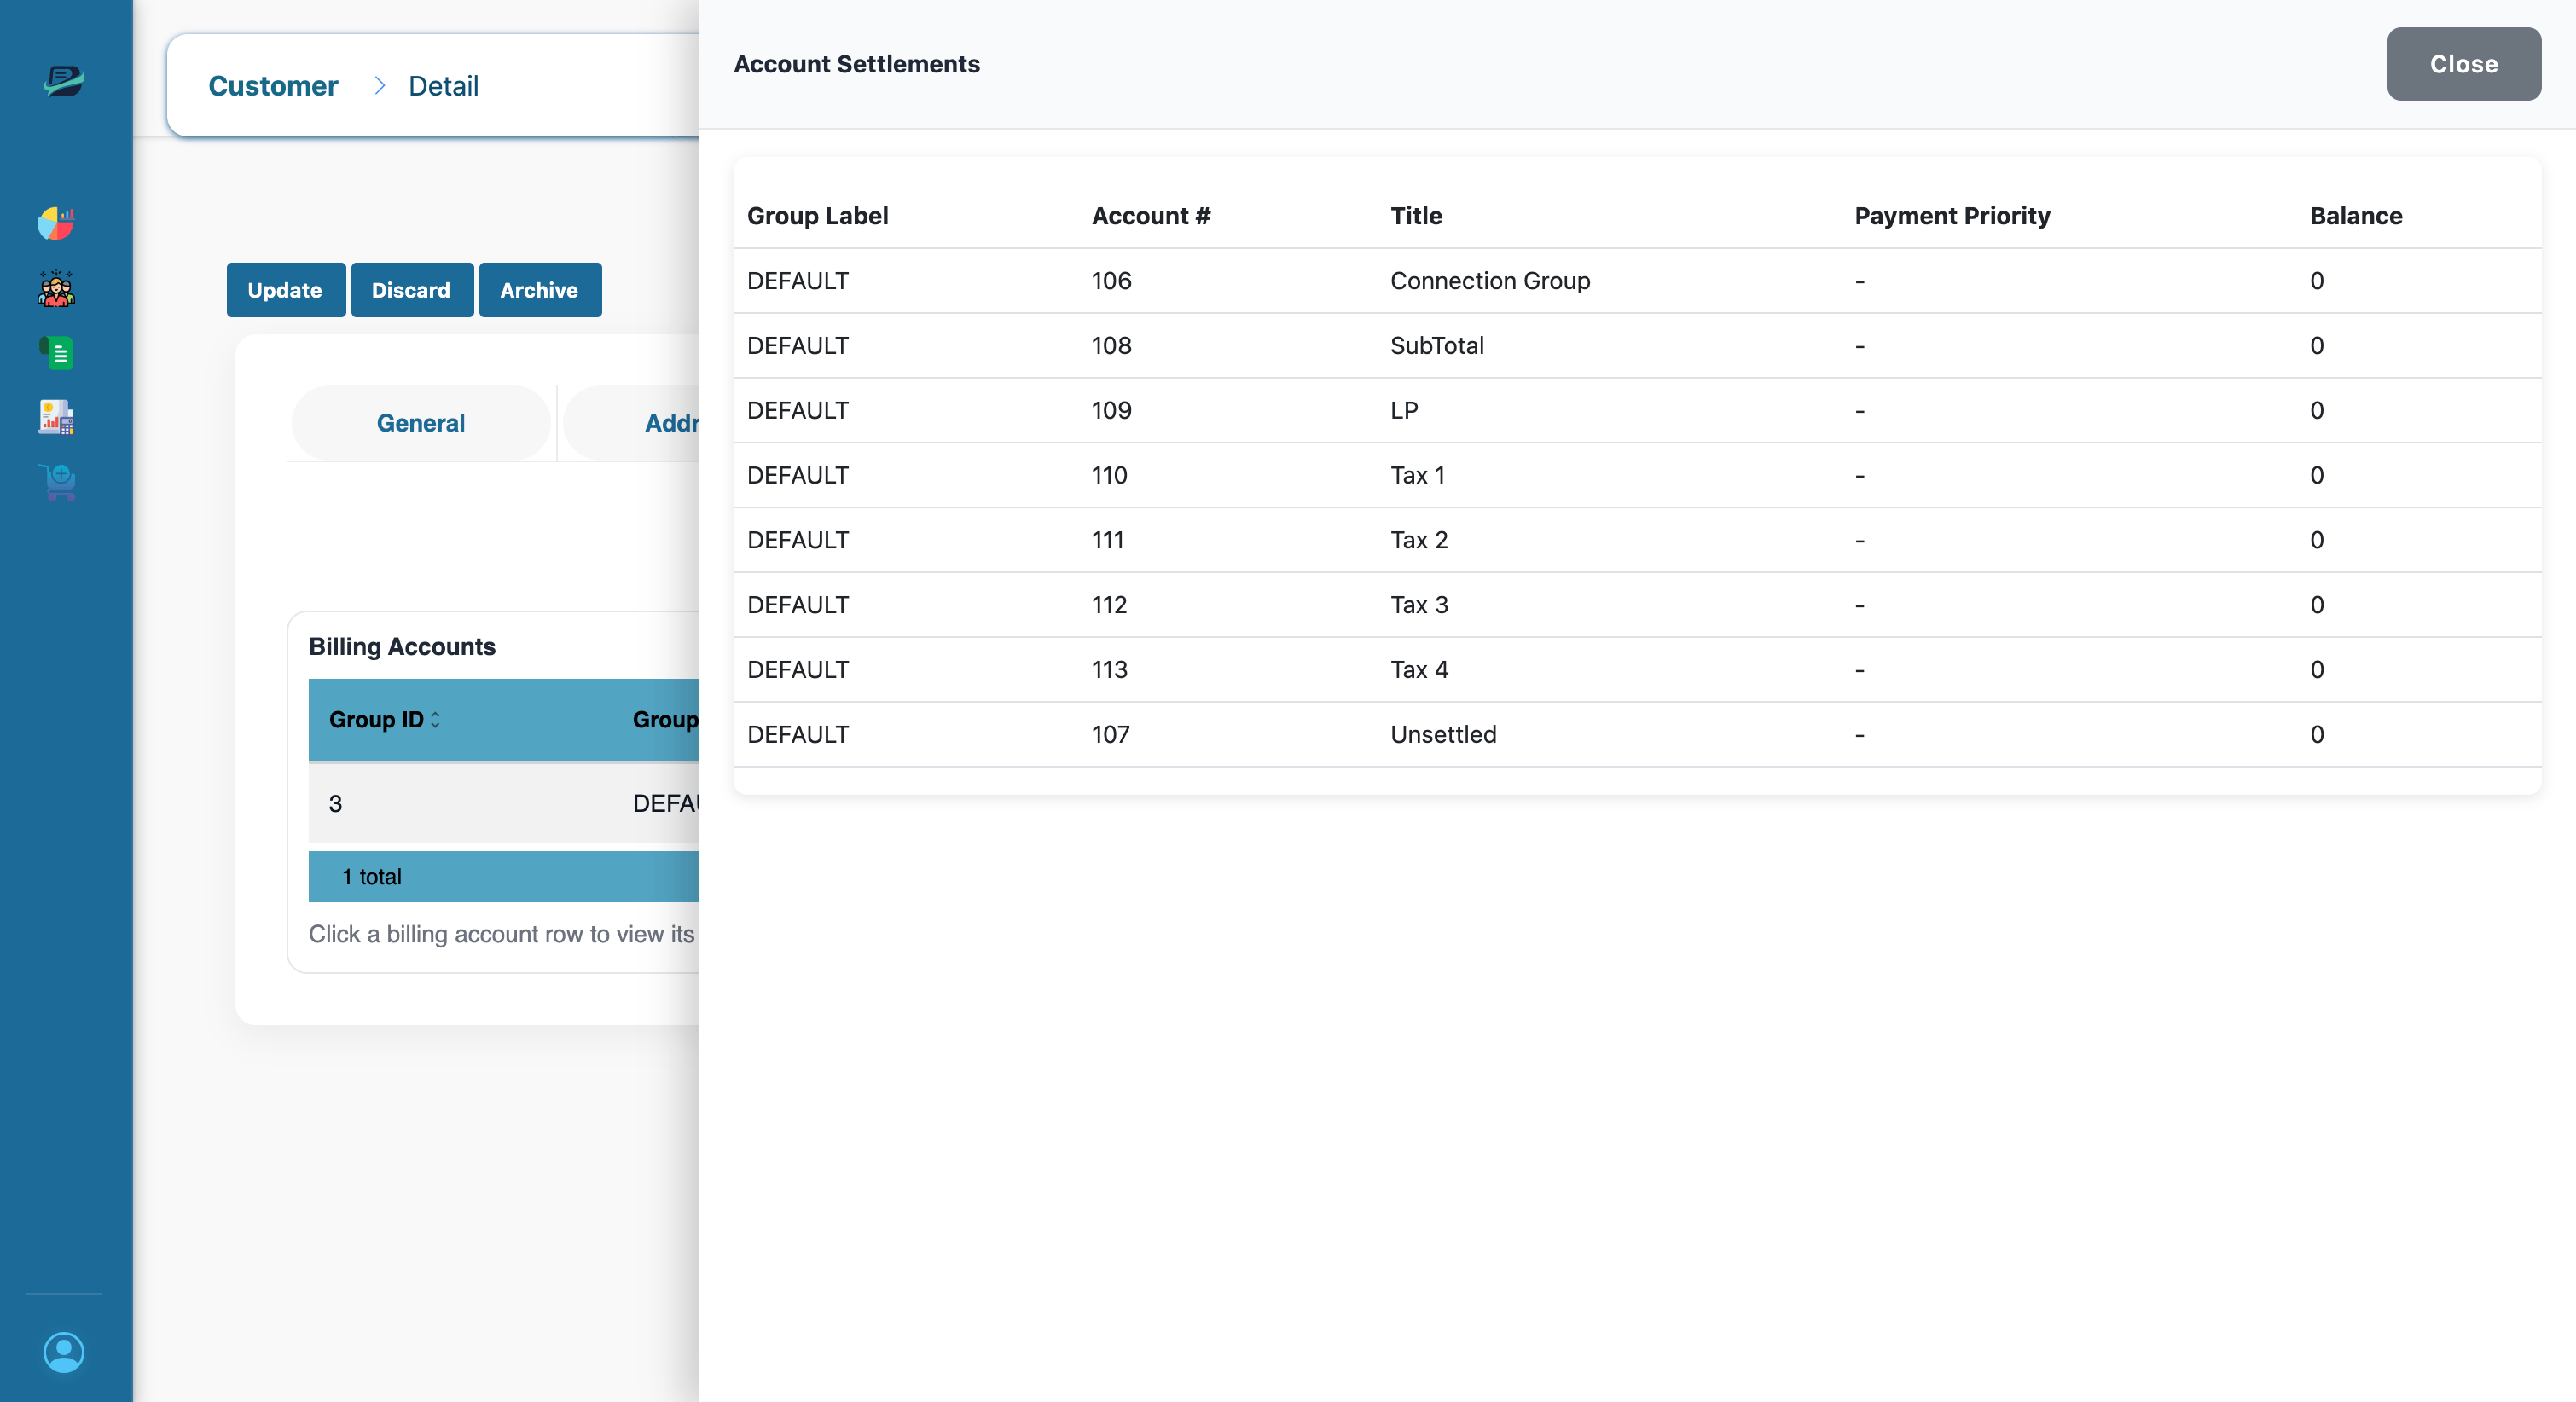 A loading spinner displays while the system retrieves details from the Accountancy module.
Once loaded, the drawer displays a tabular list of all retrieved accounts with the following columns:
| Column | Description |
| ---------------- | ------------------------------------------------------------------------- |
| Group Label | The name or label of the billing account the financial account belongs to |
| Account # | The unique identification number of the financial account |
| Title | The name or title of the financial account |
| Payment Priority | The designated priority level for payments against this account |
| Balance | The current monetary balance of the account |
If no financial accounts are linked, you will see a "No accounts found for the current billing accounts" message instead of the table.
***
### 3. Quick navigation to account details
Every row in the settlements table is interactive.
Click on a specific account row to automatically open the detailed accountancy view for that account in a new browser tab. This allows you to drill down into the account's ledger and transaction history without losing your place on the customer details page.
A loading spinner displays while the system retrieves details from the Accountancy module.
Once loaded, the drawer displays a tabular list of all retrieved accounts with the following columns:
| Column | Description |
| ---------------- | ------------------------------------------------------------------------- |
| Group Label | The name or label of the billing account the financial account belongs to |
| Account # | The unique identification number of the financial account |
| Title | The name or title of the financial account |
| Payment Priority | The designated priority level for payments against this account |
| Balance | The current monetary balance of the account |
If no financial accounts are linked, you will see a "No accounts found for the current billing accounts" message instead of the table.
***
### 3. Quick navigation to account details
Every row in the settlements table is interactive.
Click on a specific account row to automatically open the detailed accountancy view for that account in a new browser tab. This allows you to drill down into the account's ledger and transaction history without losing your place on the customer details page.